Description
Universal uPVC Door Repair Multipoint Lock Mechanism
A single mechanism that fits most doors!
High security replacement lock mechanism for uPVC doors with 35mm backset and 16mm faceplate. Featuring the durable Fullex XL split spindle centre case with reversible latch and hook, the kit also includes adjustable hook locking strips, plus frame keeps and tidy plates.
Designed for flexibility, and supplied in sections, the Universal Repair Lock is a great choice when keep positions are uncertain, or the lock type unknown. If in doubt, choose a universal lock to avoid disappointment, and costly return trips to a customer's property.
Did you know? The Fullex Universal Repair Lock is Secured by Design approved, so it's a multipoint uPVC door lock that you can trust. Secured by Design is the official UK Police initiative supporting the principles of 'designing out crime'.
Features & Benefits
- Fits Most uPVC Doors - designed for compatibility
- Left and Right Opening - easily reversable latch
- On-the-Latch Feature - sliding latch hold-back snib
- High Security Lock - Secured by Design approved
- Corrosion Resistant - meets BS EN 1670 Grade 4
- Long Life Reliability - tested to 200,000 cycles
- 10-Year Guarantee - long manufacturer warranty
The Universal Repair Lock has separate locking strips that connect to the centre case faceplate. Locking strips can be cut and positioned as necessary. Similarly, there are three separate keeps that can be easily positioned in line with the hooks of the mechanism. Tidy plates can be used to fill the space between keeps.
Centre Case & Faceplate
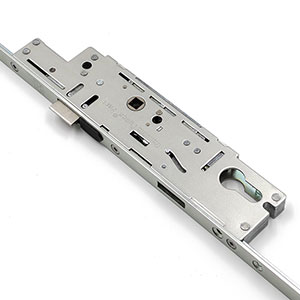
35mm backset with faceplate and connector rods. Suits split and single spindle handles with 92PZ. Reversible latch for left and right doors, with hold-back snib.
Hook Locking Strips (x2)
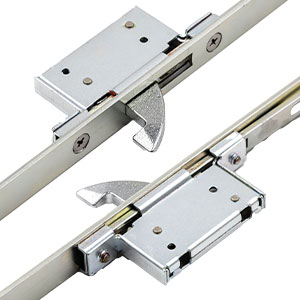
Short and long steel strips with hook case and sliding toothed rack. Rack engages with centre case to drive the projection and retraction of the hook.
Keeps (x3)
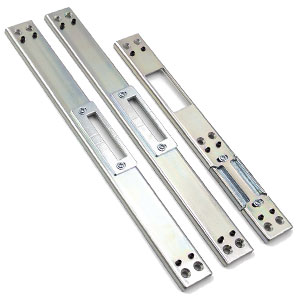
The centre and two hook keeps can be positioned independently to best match lock location. Adjustment screws allow frame offset and lateral adjustment.
Tidy Plates (x2)
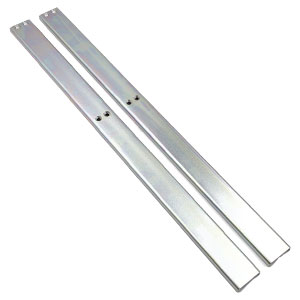
Spaces between frame keeps can be covered with these durable steel plates. Cut if necessary, before screw fixing to frame.
What You Get
What you get
The Fullex uPVC Universal Repair Lock is supplied with:
Locking Parts (Fitted to the door)
- Centre Case & Cover Plate
- Hook Locking Strip (930mm)
- Hook Locking Strip (802mm)
Keep Parts (Fitted to the Frame)
- Centre Keep
- Hook Keep (x2)
- Tidy Plate (x2)
Fixings
- Self-Drilling Fixing Screws (x28)
Technical Information
Technical Information
| Feature | Value |
|---|---|
| Backset Size | 35mm |
| Spindle Type | Split (Inline) 1 |
| Spindle-to-Barrel Centres (PZ) | 92mm |
| Faceplate Width | 16mm |
| Case Width | 50mm |
| Case Length | 227mm |
| Case Thickness | 15mm |
| Material (Hook) | A3 hardened cast steel |
| Material (Faceplate) | Dacromet coated A3 sintered steel |
| Material (Centre Case) | A3 Zinc and clear passivated (Gearbox) |
| Handle Backplate | 219mm or 243mm |
| Case Locking | Spring latch and hook |
| No of Hooks | 3 (1 x Centre Case, and 2 x Locking Strip Hooks) |
| Handedness | Left-hung and right hung-doors |
| Corrosion Resistance | BS EN 1670 Grade 4 for 240 hours |
| Cycle Operations | Tested to 200,000 operations |
| Suitability | Single and double, uPVC doors. |
| Guarantee | 10-year 2 |
1. Can also be operated by single through spindle. 2. Registration through the Fullex Locks website to activate the guarantee.
Fitting and Usage
Fitting & Usage
The following summary highlights the simplicity of fitting the uPVC Universal Repair Lock. Detailed manufacturer fitting instructions, which step you through the process, are available for downloaded.
Step 1: Prepare the Door and Frame
- Remove the door handles by extracting its fixing screws, and pulling the handles apart.
- Remove the euro cylinder lock by first taking out the single fixing screw from edge of door.
- Insert the key and turn 25° clockwise, or anti-clockwise, to align the revolving cam with lock.
- Once aligned correctly, the lock can be pulled out of the door.
- The centre case is now free to be removed with the lock mechanism.
- From the door edge, take out the screws that hold the mechanism in place.
- Carefully remove the mechanism and the centre case from the door.
- Lay the mechanism on a flat surface, ensuring that lock positions do not move, as they will be used to set the new lock
- Keeps and tidy plates can be removed from the frame, by simply removing all screws and setting them aside.
Step 2: Prepare the Centre Case
- Compare the new centre case, to the old one, noting whether the latch faces the same direction.
- If the latch faces a different direction, then switch the latch around.
- Switch latch by removing latch screw, pull out latch, rotate, then reinsert and tighten screw.
- Centre case faceplate may need to be removed to switch the latch.
Step 3: Prepare the uPVC Universal Repair Lock and Keeps
- Place the parts of the new uPVC Universal Repair Lock alongside the old lock.
- Position centre case and hook locking strips in line with old lock, and ensure hooks face the correct way.
- Ensure that the toothed rack of the locking strip engages with the teeth of the centre cases connector rods.
- Locking strips can be cut if they are too long. Bolt cutters, or a hacksaw are great for this.
Step 4: Install the uPVC Universal Repair Lock
- Insert the centre case with faceplate into the door.
- Line up the spindle and euro cylinder holes with those of the door.
- Cylinder can now be inserted and secured with fixing screw.
- Feed the handle spindle through the door, and attach both handles.
- Screw fix the handles into place on the door. Be sure to not overtighten.
- From centre case faceplate outwards, secure the full mechanism using as many screws as possible.
- Test that the handles, key, and lock operates correctly, and that hooks move freely.
Step 5: Fit Keeps and Tidy Plates
- Align centre keep with centre case, and screw fix to secure.
- Close the door and check that the lock operates within the keep.
- Adjust keep position if necessary.
- Repeat the Position-Secure-Test-Adjust steps for the top and bottom keeps.
- Measure the tidy plates against the gap between centre keep and hook keeps.
- Tidy plates can be cut to length if required, and new pilot holes drilled if necessary following cutting.
- Secure each tidy plate with four screw fixings.