Specification:
- Transmission mode: harmonic reducer + timing belt
- Material: anodic oxidation 6061 aluminum
- Right ascension: 42 step motor, 17-type harmonic, 300:1 reduction ratio
- Declination: 42 step motor, 17-type harmonic, 300:1 reduction ratio
- Load: 13 - 20kg
- Main unit weight: 4.7kg
- GOTO speed: 2.5°/s
- Electronic polar lens: iPolar /PoleMaster
- Power input: 12 - 15V/2 - 5A
- Power-off brake: right-ascension declination electronic brake, ≥48N*m
- Zeroing: Mechanical Home/Electronic Home
- Limit: mechanical limit
- Communication method: USB, BT, WiFi, ST4
- Control system: for ONSTEP
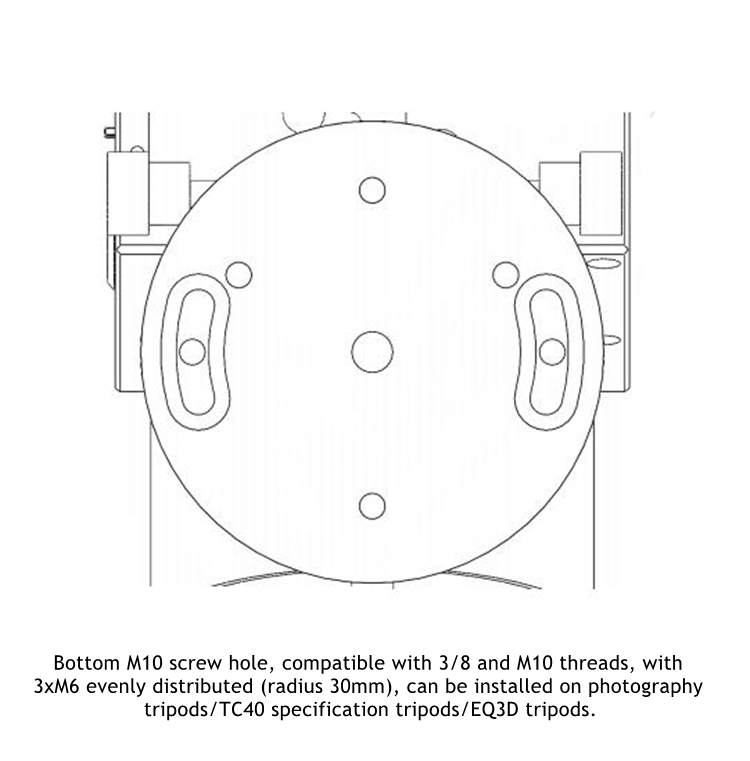
- Tripod connection: 3/8”, M6, TC40
Package Included:
- 1 x ST17 Equatorial
- 1 x Electronic Polar Lens 3M Sticker
- 1 x 1M Male to Male Power Cable (DC5.5 - 2.1MM)
- 1 x Type-B USB Data Cable
- 1 x Storage Bag
- 1 x User Manual
Note:
- ST17 defaults to VIXEN dovetail groove. If you want VIXEN&LOSMANDY dovetail groove, please contact our customer service to purchase and customize it separately.
Mechanical Limit and One-press Zeroing Function:
-
Move the Limit to the "ON" position to activate the mechanical limit
function. (default enabled) - In the state where the mechanical limit
function is enabled, regardless of the zero position defined by the
equatorial, as long as the RA axis of the equatorial touches the
physical meaning of east/west 90 degrees, the equatorial will no longer
be able to perform goto/zeroing operations to prevent kicking caused by
zero position errors. If the rotation is manually controlled, the
equatorial instrument will stop rotating when the mechanical limit is
touched for the first time. If the rotation is continued manually, there
will be no more stopping restrictions, and the equatorial can be freely
manually rotated out of the limit area.
- When ST17-P, ST20, and
ST25 touch the mechanical limit, there will be a buzzing sound prompt.
If customers need to shoot a flat field vertically at 90 degrees from
the zenith, they can temporarily turn off the limit switch to turn off
the buzzing sound. Please remember to turn it back on after shooting.
Due to the size of the motherboard, a buzzer could not be installed for
ST14/ST17.
- Instructions for using the Home button:
1. The
mechanical limit + Electronic Home version of the equatorial will rotate
to the startup zero (home) position at normal speed.
2. The
mechanical limit + Mechanical Home version of the equatorial will rotate
to the mechanical home position at a slower speed (the mechanical home
action needs to be performed at a slower speed).
Connections:
- Power Cord Connection:
1. Insert one end of the dual male power cord into the DC interface on the front panel of the equatorial meter.
2.
Connect the other end of the dual male power cord to the DC power
interface, press the equatorial switch, and turn on the power. The power
indicator light of the Electronic Home version of the equatorial is
normally on in blue and stops tracking (you need to manually turn on the
tracking function). The Mechanical Home version of the equatorial will
search for the zero position by itself after starting up, and will be in
a stop tracking state after zeroing.
- Connect Astronomical Devices such as Computers or ASIAIR:
1.
Insert the USB Type-A end of the USB data cable into the USB Type-A
interface of a computer or astronomical device such as ASIAIR.
2. Insert the USB Type-B end of the USB data cable into the USB port on the front panel of the equatorial.
- For ASIAIR Connection:
Application download: Search for "ASIAIR" in various mobile app stores to download and install.
1. Wired connection:
① Connect the USB 2.0 port of ASIAIR to the USB port of the equatorial, which needs to be powered on.
②
Open the ASIAIR mobile app and select serial port connection on the
equatorial page. It is recommended to choose OnStep equatorial (Onstep
Electronic for Mechanical Home version) and confirm that the serial port
baud rate is 9600.
2. Wireless connection:
① Open the box, select OnStep's WiFi for WiFi bridging (Password: password).
② Select OnStep for the equatorial connection option (if it is unable to connect, choose another OnStep).
③ Click on the connection method to change it to network, and enter 192.168.0.1 in the IP field and 9999 in the port field.
FAQ:
1. Why doesn't the equatorial rotate when ASIAIR is aligned with the polar axis?
-
Reason: When ASIAIR is connected to OnStep equatorial, there is a
probability that there will be no response (no rotation) to the polar
axis when controlling the rotation of the equatorial.
- Solution 1: Change the equatorial driver connection starting with OnStep name in the ASIAIR equatorial tab and try again.
- Solution 2: Restart the ZWO box.
2.
Why is the GOTO orientation not set accurately? (Completely out of the
target's sky zone, even with the telescope pointing towards the ground.)
-
Reason: The Electronic Home version equatorial was not turned on at the
correct zero position, resulting in the subsequent GOTO position being
misaligned.
- Solution: Manually set the equatorial to the correct zero position, and then restart the equatorial.
3. What do the status of the indicator lights represent?
- Red light status on: power on
- Blue light status 1, constantly flashing: in tracking.
- Blue light status 2, indicator light-off: tracking is off (encountering limit)/GOTO in progress.
2. We ship to your eBay or Paypal address. Please make sure your eBay and Paypal address is correct before you pay.
2. For remote regions of DHL/FedEx..., extra shipping costs might be charged. Usually it costs about 30USD-50USD. We will contact you if shipping company informed us your address belongs to remote area. Thanks for your understanding.
2. Please check with your country's customs office and inform us what/how much should declare before shipping.
2. If you are dissatisfied for any reason, please don't be quick to leave us neutral or negative feedback. We work hard to make sure EVERY CUSTOMER 100% SATISFIED and resolve any problem for you and always leave positive feedback to all our customers.
On Apr 3, 2026 at 00:05:30 PDT, seller added the following information: