|
|
||||||

|

|

|

|
|||


Fits:
For 1987-1991 for Toyota CAMRY 2.0L 1998CC 122CID L4 DOHC, Spec Note:(16 Valve) Eng. Code "3SFE"
For 2000-2001 for Toyota CAMRY 2.2L 2164CC L4 CNG DOHC, Spec Note:(16 Valve) Eng. Code "5SFE"
For 1992-2001 for Toyota CAMRY 2.2L 2164CC L4 DOHC, Spec Note:(16 Valve) Eng. Code "5SFE"
For 1988-1989 for Toyota CELICA TURBOCHARGED 2.0L 1998CC 122CID L4 DOHC, Spec Note:(16 Valve) Eng. Code "3SFE"
For 1987-1989 for Toyota CELICA 2.0L 1998CC 122CID L4 DOHC, Spec Note:(16 Valve) Eng. Code "3SFE"
For 1986-1989 for Toyota CELICA 2.0L 1998CC L4 DOHC, Spec Note:(16 Valve) Eng. Code "3SFE"
For 1990-1999 for Toyota CELICA 2.2L 2164CC L4 DOHC, Spec Note:(16 Valve) Eng. Code "5SFE"
For 1991-1994 for Toyota MR2 2.2L 2164CC L4 DOHC, Spec Note:(16 Valve) Eng. Code "5SFE"
For 1996-2000 for Toyota RAV4 2.0L 1998CC 122CID L4 DOHC
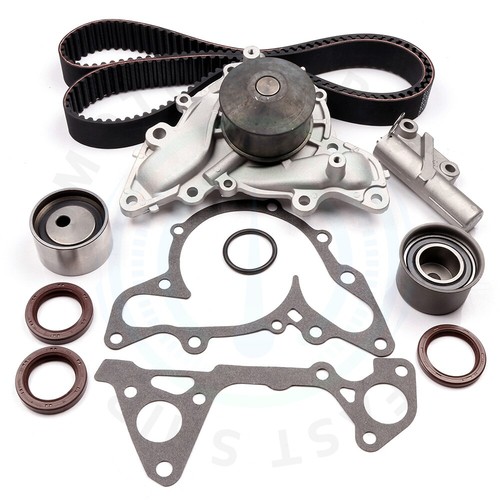
Package Include:
1 Timing Belt (163 teeth)
1 GMB Roller Tensioner Bearing
1 GMB Idler Bearing
1 AISIN Water Pump w/ Gasket
1 Valve Cover Gasket
4 Spark Plug Tube Seals
Item Notes:
Before purchasing, please check whether it is fit for your vehicle in the fitment chart to avoid unnecessary returns.
If you have any questions, you can contact us to provide you with the most satisfactory service.
What is a Timing Belt Kit?
The belt in a timing belt kit is an essential component of a car's engine, responsible for synchronizing the rotation of the crankshaft and camshaft. The rotation of the camshaft and the crankshaft has to be in perfect time for the valves, pistons and other moving parts to work properly.
How to replace the timing belt kit:
-Gaskets.
Whilst getting hold of the belt it is also a good idea to buy some new gaskets and gasket adhesive.
-Disconnect the battery.
To make sure that you don’t suffer any nasty electrical shocks whilst you are working on your vehicle, disconnect the negative battery cable from its terminal. There is no need to remove the entire battery; just breaking the circuit will be enough to keep you safe. Remember that you may need to enter a code to regain access to your in-built electrical devices such as radios and GPS when you reconnect the battery later on.
-Remove the alternator belt.
The alternator belt is a smaller belt which is usually located on top of or in front of the timing belt. You will need to loosen the nuts in order to create slack to be able to take the belt off. On some makes and models of car it will also be necessary to remove the serpentine belt. If it is in the way then you will need to take it off.
-Accessories.
There are quite a few car accessories such as the power steering pump and the air conditioning compressor which will often prevent you from gaining direct access to your timing belt. Remove all of these by loosening the nuts and taking care to remember what goes where. You don't need to remove any pressurized fittings, so take care not to discharge any pressurized systems. Otherwise, it could cause many problems later.
-Distributor cap.
If your car has a distributor cap then you will need to remove it. This may involve prying apart some very stubborn clips but there will also be screws holding it in place so make sure that you remove these too.
-Timing marks.
Rotate the crankshaft bolt so that the timing mark aligns with the 0 on the timing scale. You will need a spanner to do this.
-Screws and bolts.
Remove all of the screws and bolts which hold in the timing cover in position. Take the cover off completely .
-Alignment.
Check that the crankshaft and the camshaft timing marks are properly aligned. You should find that there are dots or lines on both the pulleys and the shaft heads which should be lined up. Make sure that the corresponding marks are in the right place.
-Leaks.
Make sure that there are no leaks of oil or water around the area in which you are going to be working.
-Belt Tensioner.
Loosen the bolts which hold the belt tensioner in place to create slack which will allow you to slide the old timing belt off.
-New belt.
Position the new belt in place and make sure that you torque it according to the correct specifications laid out in your manual.
-Reassemble.
Once your new belt is in place and correctly tensioned, replace all of the parts of the car which you had previously removed in reverse order to the way in which you took them off. Test drive. Start the engine and drive slowly around some quiet roads to check that the timing belt has been correctly fitted and that there is no other damage to the car’s engine.
| Item Specifics | |
|---|---|
| Brand | 4umotorcarparts |
| Type | Engine Timing Belt Kit |
| Manufacturer Part Number | 13555330 |
| Manufacturer Warranty | 1 Year |
| Placement on Vehicle | Front |
| Interchange Part Number | WP2021, VC2005, WP170-1770, TS26199, VS50059, TS26138 |
| Other Part Number | 13568-09041, 13503-63011, 16110-79026, VS50304R, ITM138 |
| OE Part Number | TBK138, WPTO021, VCTO005, 036-1479, 036-1479, ES70739 |
| Vintage Car Part | No |
| Universal Fitment | No |
| Kit or Single Part | Kit |
| Kit Parts Included | Engine Timing Belt Kit, Water Pump, Valve Cover Gasket Set |
| Material | Rubber/Steel/Plastic |
| Fitment Type | Direct Replacement |
| Fitment Note | Fit 3SFE, 5SFE Engine |
Any payment methods accepted by ebay will be acceptale.
 G Pay.
 VISA.
VISA.
 Master Card.
 AMERICAN EXPRESS.
 DISCOVER.


 And other payment.
And it will takes 2-7 days in transit, according to the address, there will be a different EST.
 USPS:United States Postal Service
 UPS:United Parcel Service

30-day Free Return.
Any problem caused by seller, we will provide a 30 days free return. Any problem caused by buyer, we need a 20% restocking fee when we accept the return.
Please confim the compatible chart before placing the order.
If you have any question or problem below, feel free to contact us please.
① Cannot confirm if the part will fit your vehicle or not?
② Cannot confim the size or color of this item?
③ Don't know what kind of part your vehicle need to change?
④ Want to know when will us start a sale?
⑤ Arrived wrong part?
⑥ Arrived damaged?
⑦ Cannot work after install the parts?
⑧ Need a return?
⑨ Other question or ptoblem?
Contact us via eBay message please.
Customer Service's online time:
Monday-Friday: Answer the question and handle the problem within 24 hours.
Saturday-Sunday: Answer the question and handle the problem within 48 hours.
Shop Category Hot Item
New List Item
Help & Info Payment Policy Shipping Policy Return Policy FAQ About Us |
Timing Belt Kit Water Pump Gasket For Toyota RAV4 1996-2000 Camry 1992 93-2001
Fits: For 1987-1991 for Toyota CAMRY 2.0L 1998CC 122CID L4 DOHC, Spec Note:(16 Valve) Eng. Code "3SFE" For 2000-2001 for Toyota CAMRY 2.2L 2164CC L4 CNG DOHC, Spec Note:(16 Valve) Eng. Code "5SFE" For 1992-2001 for Toyota CAMRY 2.2L 2164CC L4 DOHC, Spec Note:(16 Valve) Eng. Code "5SFE" For 1988-1989 for Toyota CELICA TURBOCHARGED 2.0L 1998CC 122CID L4 DOHC, Spec Note:(16 Valve) Eng. Code "3SFE" For 1987-1989 for Toyota CELICA 2.0L 1998CC 122CID L4 DOHC, Spec Note:(16 Valve) Eng. Code "3SFE" For 1986-1989 for Toyota CELICA 2.0L 1998CC L4 DOHC, Spec Note:(16 Valve) Eng. Code "3SFE" For 1990-1999 for Toyota CELICA 2.2L 2164CC L4 DOHC, Spec Note:(16 Valve) Eng. Code "5SFE" For 1991-1994 for Toyota MR2 2.2L 2164CC L4 DOHC, Spec Note:(16 Valve) Eng. Code "5SFE" For 1996-2000 for Toyota RAV4 2.0L 1998CC 122CID L4 DOHC
Package Include: 1 Timing Belt (163 teeth) 1 GMB Roller Tensioner Bearing 1 GMB Idler Bearing 1 AISIN Water Pump w/ Gasket 1 Valve Cover Gasket 4 Spark Plug Tube Seals
Item Notes: Before purchasing, please check whether it is fit for your vehicle in the fitment chart to avoid unnecessary returns. If you have any questions, you can contact us to provide you with the most satisfactory service.
What is a Timing Belt Kit? The belt in a timing belt kit is an essential component of a car's engine, responsible for synchronizing the rotation of the crankshaft and camshaft. The rotation of the camshaft and the crankshaft has to be in perfect time for the valves, pistons and other moving parts to work properly.
How to replace the timing belt kit: -Gaskets. Whilst getting hold of the belt it is also a good idea to buy some new gaskets and gasket adhesive.
-Disconnect the battery. To make sure that you don’t suffer any nasty electrical shocks whilst you are working on your vehicle, disconnect the negative battery cable from its terminal. There is no need to remove the entire battery; just breaking the circuit will be enough to keep you safe. Remember that you may need to enter a code to regain access to your in-built electrical devices such as radios and GPS when you reconnect the battery later on.
-Remove the alternator belt. The alternator belt is a smaller belt which is usually located on top of or in front of the timing belt. You will need to loosen the nuts in order to create slack to be able to take the belt off. On some makes and models of car it will also be necessary to remove the serpentine belt. If it is in the way then you will need to take it off.
-Accessories. There are quite a few car accessories such as the power steering pump and the air conditioning compressor which will often prevent you from gaining direct access to your timing belt. Remove all of these by loosening the nuts and taking care to remember what goes where. You don't need to remove any pressurized fittings, so take care not to discharge any pressurized systems. Otherwise, it could cause many problems later.
-Distributor cap. If your car has a distributor cap then you will need to remove it. This may involve prying apart some very stubborn clips but there will also be screws holding it in place so make sure that you remove these too.
-Timing marks. Rotate the crankshaft bolt so that the timing mark aligns with the 0 on the timing scale. You will need a spanner to do this.
-Screws and bolts. Remove all of the screws and bolts which hold in the timing cover in position. Take the cover off completely .
-Alignment. Check that the crankshaft and the camshaft timing marks are properly aligned. You should find that there are dots or lines on both the pulleys and the shaft heads which should be lined up. Make sure that the corresponding marks are in the right place.
-Leaks. Make sure that there are no leaks of oil or water around the area in which you are going to be working.
-Belt Tensioner. Loosen the bolts which hold the belt tensioner in place to create slack which will allow you to slide the old timing belt off.
-New belt. Position the new belt in place and make sure that you torque it according to the correct specifications laid out in your manual.
-Reassemble. Once your new belt is in place and correctly tensioned, replace all of the parts of the car which you had previously removed in reverse order to the way in which you took them off. Test drive. Start the engine and drive slowly around some quiet roads to check that the timing belt has been correctly fitted and that there is no other damage to the car’s engine.
All right reserved. |
|||||||||||||||||||||||||||||||||||||||||||||||||||||||||||||||||||||