As technology continues its relentless expansion into every aspect of our lives and becomes more affordable, many individuals choose to create their own home security systems. With these Do-It-Yourself systems, you can customize the level of security to fit your needs. Having a system in place can help give some peace of mind whether you’re checking in on your kids, seeing the mess your pet left, or, most importantly, ensuring your property is protected.
From Silicon Valley startup MivaTek, a provider of security platforms that protect virtual private networks for businesses, comes a mobile cloud alarm system for consumers, the Home8. The startup kit integrates internet-accessible IP-cameras, windows/door sensors, and a storage hub into a simple all-in-one system for security. There are other models available that can also track health care needs (like medication tracking and elder care). Home8 is easy to install (though maybe a little more setup time in two-story homes – more on that later) and you can expand coverage with new sensors and extra cameras at an additional cost.
Home8 offers a free cloud storage subscription for up to three user accounts and a single location, whether it’s your home or business. For security coverage in multiple locations or to add more user accounts, the subscription fees are $9.95 per month for every five users and $9.95 per month for every additional location. Also, add-on cameras have tiered-pricing as well at an additional $5 per month for the first four cameras, then 5-8 cameras, 9-12 and so on. With the Home8 Starter Kit retailing for $299.99, this is an affordable option for home and business security services, especially for a single location.
Now that you have a better idea of what the Home8 ecosystem can offer, let’s go into more detail about the Home8 Starter Kit.
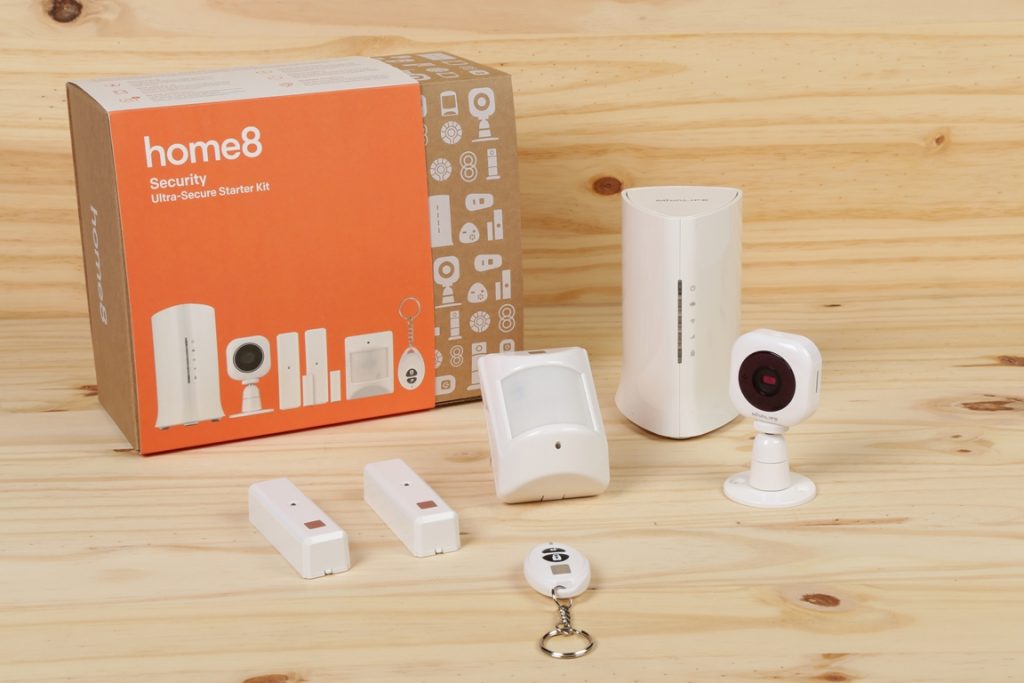
Home8 Security Ultra-Secure starter kit – What’s in the box
Home8 has a broad selection of starter kits to choose from, designed to match any needs while providing simple to set up and easy to use security systems. There are two versions of the Ultra-Secure Starter Kit; the first kit focuses on safety with sensors for fire + CO (Carbon Monoxide) and water leaks while the second kit focuses on home intrusion security with window/door sensors and an infrared motion sensor. Today, we’re looking at the latter.
Inside the box, we find the following devices (including batteries and mounting options):
- 1x Mini Cube HD camera
- 1x Security Shuttle
- 2x door + window sensors
- 1x infrared motion sensor
- 1x keychain remote
After unpacking all the devices, follow the included instructions on getting the system set up and download the Home8 App for your device. The shuttle itself simply connects to your existing Wi-Fi network and it actually blends in nicely with any router setup.
When setting up, make sure to connect the sensors and remote through the app within 15 feet of the Security Shuttle. This helps ensure that your devices are connected properly. With all the devices connected to the shuttle, you can now move them to the areas where you want coverage. You can check if the devices are still connected to the shuttle via the app.
With all the devices ready to protect your home or business, let’s break down the devices and how they work to secure what’s important to you.
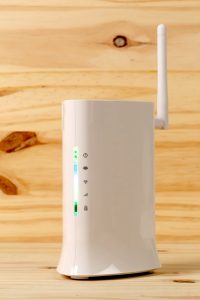
Home8 Shuttle – The security brain
The integral device for any Home8 system is the aforementioned Security Shuttle. This creates a closed network within your home that protects your data securely with a firewall, bank-level encryption, and anti-sniffing capabilities (think protection against Trojan horse attacks hidden in other malicious software) that only lets you and authorized users access the security system. It stores video locally, emits a high pitched sound to deter intruders and alert family members, and sends notifications to your smart phone in any emergency.
Setting up the Security Shuttle is easy. Simply plug this into your router and connect the power, then you can add all your security devices through the app. Tuck the Shuttle away with your router and it looks like any other network peripheral, which is great to guard against anyone trying to disable your security system. When any of your devices detect motion, sound, or a triggered-sensor, all those events are recorded and bookmarked for easy viewing, providing comfort 24/7. You can save up to 1TB worth of videos on the Shuttle’s private NAS in addition to the local storage in the Mini Cube HD camera (which requires a MicroSD card, sold separately).

Mini Cube HD camera
This security system comes with one camera that’s about the dimensions of a credit card. Despite its small size, the Mini Cube HD camera sports a wide viewing angle of 100° and 720p HD video. When set up high on a wall, this is enough viewing coverage for multiple entry ways and paths. The camera also has infrared night vision capabilities, so you can have coverage around the clock. Keep in mind that the camera needs an A/C outlet nearby for power so an extension cable might be necessary depending on your setup.
The camera itself can be connected to your Wi-Fi network to ensure that you get the best feed possible when checking video recordings through the app. With expandable flash storage up to 64GB, the camera will still record any motion in the event the camera loses Wi-Fi connection, and upload any videos when it re-establishes a connection.
For my camera setup, I wanted coverage over the front porch for packages or intruders checking to see if anyone was home. I mounted the camera on the window sill overlooking the porch, and after looking at the live feed through the app, the wide angle captures the entire porch and the walkway with ease. When armed, I received notifications when the camera detected motion from people, but it also sent alerts for trees moving in the wind. I’ve since lowered the motion detection sensitivity and I haven’t been alerted of any suspicious trees since.
Picture quality during the day was remarkable, with more definition than typical CCTV systems. With the setup I have for the camera, night vision didn’t quite work since the camera’s power indicator reflected against the glass, which made the images/videos at night not so useful in case of an emergency. To ensure proper video coverage at night, I would suggest keeping some distance between the camera and any reflective surfaces that might cause a glare.

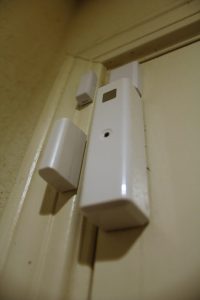
The digital trip wire –motion sensors
The included window/door sensors and infrared motion sensor help protect areas that may not be covered by the camera. These are easy to set up on windows or doors thanks to the double-sided adhesive. When the sensor can’t detect the adjacent magnet, the alarm will be tripped.
Since my home already has extra locking devices on the windows, they don’t open that often and I feel that a burglar would be more inclined to break the glass when they realize the windows won’t slide. So I’ve set them up on the garage door and front door. They work like a charm and send me alerts when a door’s been opened while the system is armed. The same goes for the infrared motion sensor; stick it anywhere you want motion detection coverage and it’ll do the rest.
Home security placement
With this security-focused starter kit, you’ll be able to protect two doors/windows, a large area with the motion sensor, and a camera that can be installed indoors or outside. After all your devices are set up, slowly start moving about 15 feet away from the shuttle to ensure connectivity.
As technology continues its relentless expansion into every aspect of our lives and becomes more affordable, many individuals choose to create their own home security systems. With these Do-It-Yourself systems, you can customize the level of security to fit your needs. Having a system in place can help give some peace of mind whether you’re checking in on your kids, seeing the mess your pet left, or, most importantly, ensuring your property is protected.
From Silicon Valley startup MivaTek, a provider of security platforms that protect virtual private networks for businesses, comes a mobile cloud alarm system for consumers, the Home8. The startup kit integrates internet-accessible IP-cameras, windows/door sensors, and a storage hub into a simple all-in-one system for security. There are other models available that can also track health care needs (like medication tracking and elder care). Home8 is easy to install (though maybe a little more setup time in two-story homes – more on that later) and you can expand coverage with new sensors and extra cameras at an additional cost.
Home8 offers a free cloud storage subscription for up to three user accounts and a single location, whether it’s your home or business. For security coverage in multiple locations or to add more user accounts, the subscription fees are $9.95 per month for every five users and $9.95 per month for every additional location. Also, add-on cameras have tiered-pricing as well at an additional $5 per month for the first four cameras, then 5-8 cameras, 9-12 and so on. With the Home8 Starter Kit retailing for $299.99, this is an affordable option for home and business security services, especially for a single location.
Now that you have a better idea of what the Home8 ecosystem can offer, let’s go into more detail about the Home8 Starter Kit.
Home8 Security Ultra-Secure starter kit – What’s in the box
Home8 has a broad selection of starter kits to choose from, designed to match any needs while providing simple to set up and easy to use security systems. There are two versions of the Ultra-Secure Starter Kit; the first kit focuses on safety with sensors for fire + CO (Carbon Monoxide) and water leaks while the second kit focuses on home intrusion security with window/door sensors and an infrared motion sensor. Today, we’re looking at the latter.
Inside the box, we find the following devices (including batteries and mounting options):
- 1x Mini Cube HD camera
- 1x Security Shuttle
- 2x door + window sensors
- 1x infrared motion sensor
- 1x keychain remote
After unpacking all the devices, follow the included instructions on getting the system set up and download the Home8 App for your device. The shuttle itself simply connects to your existing Wi-Fi network and it actually blends in nicely with any router setup.
When setting up, make sure to connect the sensors and remote through the app within 15 feet of the Security Shuttle. This helps ensure that your devices are connected properly. With all the devices connected to the shuttle, you can now move them to the areas where you want coverage. You can check if the devices are still connected to the shuttle via the app.
With all the devices ready to protect your home or business, let’s break down the devices and how they work to secure what’s important to you.
Home8 Shuttle – The security brain
The integral device for any Home8 system is the aforementioned Security Shuttle. This creates a closed network within your home that protects your data securely with a firewall, bank-level encryption, and anti-sniffing capabilities (think protection against Trojan horse attacks hidden in other malicious software) that only lets you and authorized users access the security system. It stores video locally, emits a high pitched sound to deter intruders and alert family members, and sends notifications to your smart phone in any emergency.
Setting up the Security Shuttle is easy. Simply plug this into your router and connect the power, then you can add all your security devices through the app. Tuck the Shuttle away with your router and it looks like any other network peripheral, which is great to guard against anyone trying to disable your security system. When any of your devices detect motion, sound, or a triggered-sensor, all those events are recorded and bookmarked for easy viewing, providing comfort 24/7. You can save up to 1TB worth of videos on the Shuttle’s private NAS in addition to the local storage in the Mini Cube HD camera (which requires a MicroSD card, sold separately).
Mini Cube HD camera
This security system comes with one camera that’s about the dimensions of a credit card. Despite its small size, the Mini Cube HD camera sports a wide viewing angle of 100° and 720p HD video. When set up high on a wall, this is enough viewing coverage for multiple entry ways and paths. The camera also has infrared night vision capabilities, so you can have coverage around the clock. Keep in mind that the camera needs an A/C outlet nearby for power so an extension cable might be necessary depending on your setup.
The camera itself can be connected to your Wi-Fi network to ensure that you get the best feed possible when checking video recordings through the app. With expandable flash storage up to 64GB, the camera will still record any motion in the event the camera loses Wi-Fi connection, and upload any videos when it re-establishes a connection.
For my camera setup, I wanted coverage over the front porch for packages or intruders checking to see if anyone was home. I mounted the camera on the window sill overlooking the porch, and after looking at the live feed through the app, the wide angle captures the entire porch and the walkway with ease. When armed, I received notifications when the camera detected motion from people, but it also sent alerts for trees moving in the wind. I’ve since lowered the motion detection sensitivity and I haven’t been alerted of any suspicious trees since.
Picture quality during the day was remarkable, with more definition than typical CCTV systems. With the setup I have for the camera, night vision didn’t quite work since the camera’s power indicator reflected against the glass, which made the images/videos at night not so useful in case of an emergency. To ensure proper video coverage at night, I would suggest keeping some distance between the camera and any reflective surfaces that might cause a glare.
The digital trip wire –motion sensors
The included window/door sensors and infrared motion sensor help protect areas that may not be covered by the camera. These are easy to set up on windows or doors thanks to the double-sided adhesive. When the sensor can’t detect the adjacent magnet, the alarm will be tripped.
Since my home already has extra locking devices on the windows, they don’t open that often and I feel that a burglar would be more inclined to break the glass when they realize the windows won’t slide. So I’ve set them up on the garage door and front door. They work like a charm and send me alerts when a door’s been opened while the system is armed. The same goes for the infrared motion sensor; stick it anywhere you want motion detection coverage and it’ll do the rest.
Home security placement
With this security-focused starter kit, you’ll be able to protect two doors/windows, a large area with the motion sensor, and a camera that can be installed indoors or outside. After all your devices are set up, slowly start moving about 15 feet away from the shuttle to ensure connectivity.