Connect
the Ground Wire ring connector to the engine case using one of the
engine case screws.
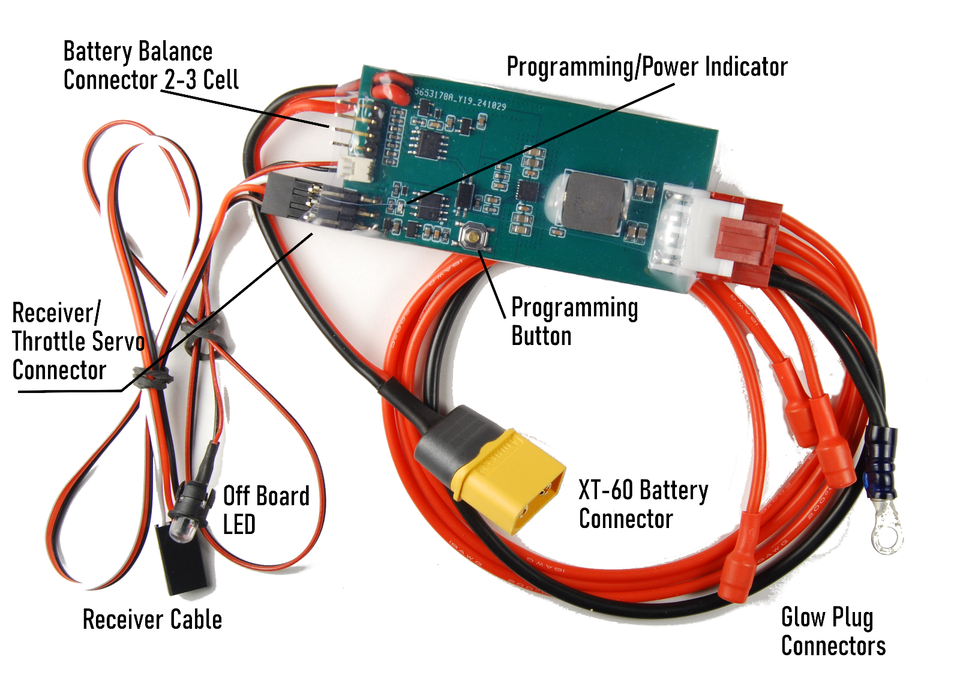
Plug
the Glow Plug connectors onto the Glow Plugs. It can sometimes be
beneficial to clean the glow plug first with alcohol and then give
the connector a few twists back and forth after plugging on to
ensure a good connection.
Plug
the supplied Patch Cable into the throttle channel of your receiver.
Any channel can actually be used for control, but for the sake of
simplicity in this example we're using the throttle channel.
To
avoid using a “Y” cable, the Throttle Servo can be plugged into
the same double 3 pin connector on the controller board that the
patch cable is plugged into.
Plug
the Battery Pack you've chosen for powering the glow plugs into the
XT-60 pigtail connector. Using a 2 or 3 Cell LIPO is the recommended
battery pack, but any battery pack up to 12.6V MAX can be used, as
long as it can deliver 0.5 to 2A continuous (depending on voltage).
Builtin Battery Protection is provided if you plug the balance plug
onto the board. Low battery is indicated by flashing the offboard
LED in double blinks when any battery cell voltage gets down to
about 3.5V per cell. Low Battery Cutoff occurs at about 3.0V per
cell and is indicated with a rapid continuous single blink of the
off board LED and the glow plug shutting off to prevent damaging the
battery. The glow battery must then be disconnected to reset the
battery monitor system.
Turn
your transmitter and receiver on. The programming / power LED on the
controller board should light up indicating it's powered and
running.
Controllers
come programmed to turn the glow plug on when the throttle is set to
less than 50%. If you need it to be some other setting or you need
to reverse the direction of the controller, use the programming
button on the board:
Simply set the throttle to the setting you
would like the glow plug to come on at and PRESS AND RELEASE the
programming button. The onboard LED indicator will blink indicating
programming was accomplished.
If you would like to reverse the
direction AND program the throttle position, set the throttle lever
to where you want the glow plug to come on and then PRESS AND HOLD
the button (about 2 seconds) until the onboard LED blinks and then
release.
The
offboard LED holder will mount in a 1/4" hole. I like to mount
it somewhere that I can see it while flying / driving.
That's
it. Go Fly! or Drive!