| 1 Cylinder Onboard Glow Plug Driver / Controller One Button Programmable Fully Isolated WE HAVE NEW GLOW PLUG HEAD LOCK CHOICES This Listing Fits 2.8mm OS YS and other glow plugs that have a ~2.8mm prong A complete list of all of our glow plug controllers and connector options can be found below. FULLY REGULATED TO DELIVER THE SAME 1.2VDC TO THE GLOW PLUG HARNESS NO MATTER WHAT THE BATTERY VOLTAGE IS FROM 3.0V - 8.4V | |
STILL THE BEST ONBOARD RC GLOW PLUG DRIVER THERE IS:
| |
Complete Glow Controller / Driver list: 1 Cylinder Onboard Glow Plug Driver Push Button On 25 Seconds Off 2.45mm SAITO 1 Cylinder Onboard Glow Plug Driver Push Button On 25 Seconds Off 2.8mm OS YS 1 Cylinder Onboard Glow Plug Driver Push Button On 25 Seconds Off 90 Degree 1 Cylinder Onboard Glow Plug Driver Controller - One Button Program 2.45mm SAITO 1 Cylinder Onboard Glow Plug Driver Controller - One Button Program 2.8mm OS YS 1 Cylinder Onboard Glow Plug Driver Controller - One Button Program 90 Degree 2 Cylinder Onboard Glow Plug Driver Controller - One Button Program 2.45mm SAITO 2 Cylinder Onboard Glow Plug Driver Controller - One Button Program 2.8mm OS YS 2 Cylinder Onboard Glow Plug Driver Controller - One Button Program 90 Degree 3 Cylinder Onboard Glow Plug Driver Controller - One Button Program 2.45mm SAITO 3 Cylinder Onboard Glow Plug Driver Controller - One Button Program 2.8mm OS YS 3 Cylinder Onboard Glow Plug Driver Controller - One Button Program 90 degree 4 Cylinder Onboard Glow Plug Driver Controller - One Button Program 2.45mm SAITO 4 Cylinder Onboard Glow Plug Driver Controller - One Button Program 2.8mm OS YS 4 Cylinder Onboard Glow Plug Driver Controller - One Button Program 90 degree 5 Cylinder Onboard Glow Plug Driver Controller - One Button Program 2.45mm SAITO 5 Cylinder Onboard Glow Plug Driver Controller - One Button Program 2.8mm OS YS 5 Cylinder Onboard Glow Plug Driver Controller - One Button Program 90 degree 6 Cylinder Onboard Glow Plug Driver Controller - One Button Program 2.45mm SAITO 6 Cylinder Onboard Glow Plug Driver Controller - One Button Program 2.8mm OS YS 6 Cylinder Onboard Glow Plug Driver Controller - One Button Program 90 degree 7 Cylinder Onboard Glow Plug Driver Controller - One Button Program 2.45mm SAITO 7 Cylinder Onboard Glow Plug Driver Controller - One Button Program 2.8mm OS YS 7 Cylinder Onboard Glow Plug Driver Controller - One Button Program 90 degree 8 Cylinder Onboard Glow Plug Driver Controller - One Button Program 2.45mm SAITO 8 Cylinder Onboard Glow Plug Driver Controller - One Button Program 2.8mm OS YS 8 Cylinder Onboard Glow Plug Driver Controller - One Button Program 90 degree 9 Cylinder Onboard Glow Plug Driver Controller - One Button Program 2.45mm SAITO 9 Cylinder Onboard Glow Plug Driver Controller - One Button Program 2.8mm OS YS 9 Cylinder Onboard Glow Plug Driver Controller - One Button Program 90 degree Condition: Brand New Production Happy to answer any questions FAST FREE USA SHIPPING! Instructions: 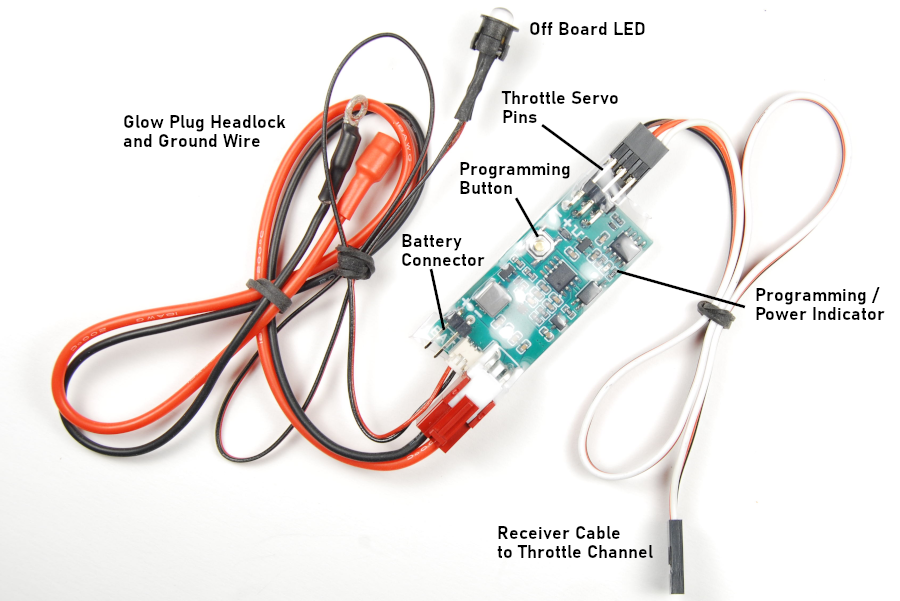
If you have any questions please don't hesitate to ask. I'm here to make sure you have success with the product. Contact John through the ebay messaging system.
 |