Product parameters:
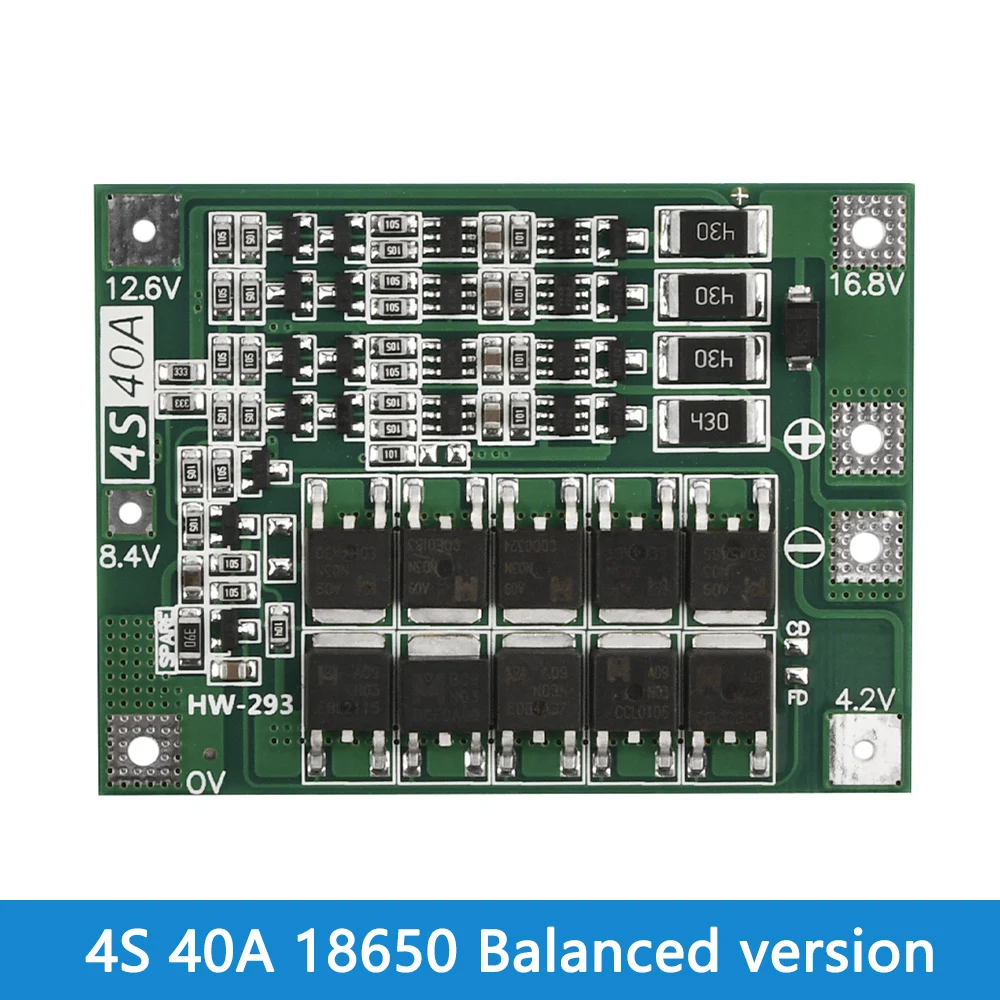
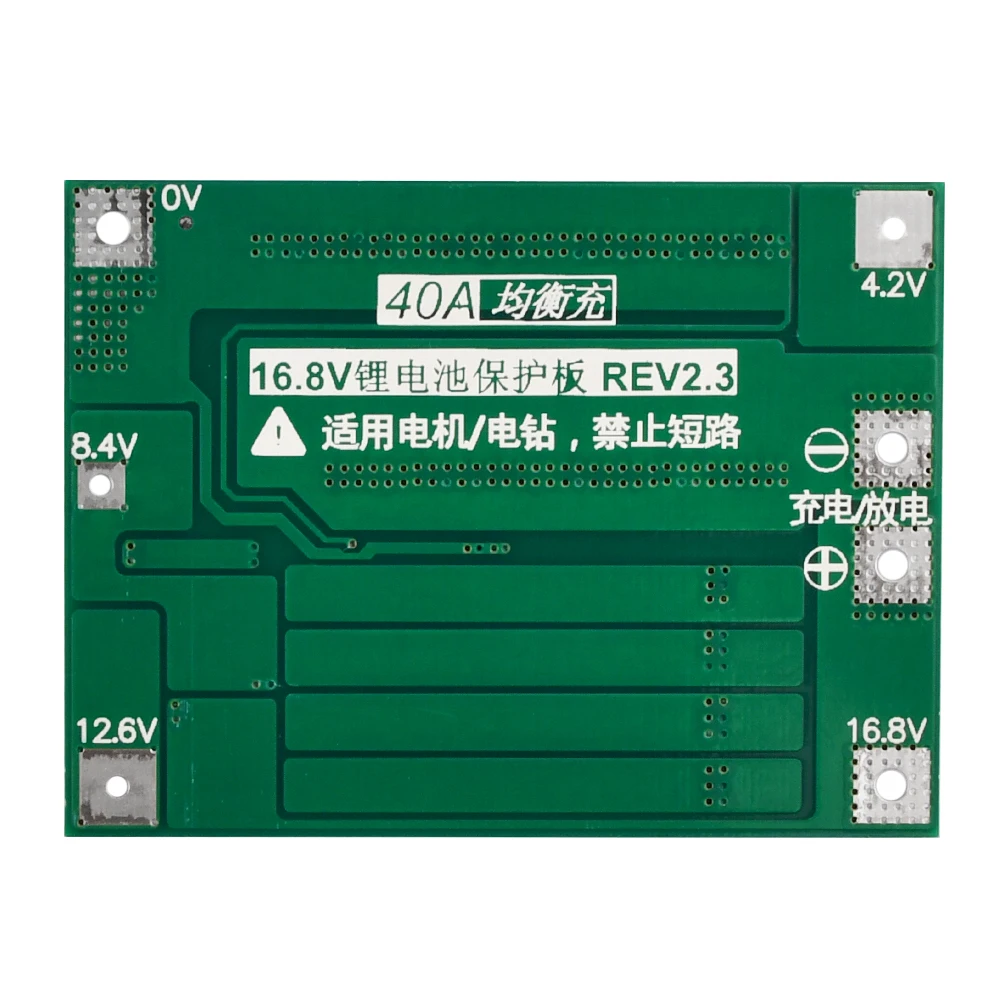
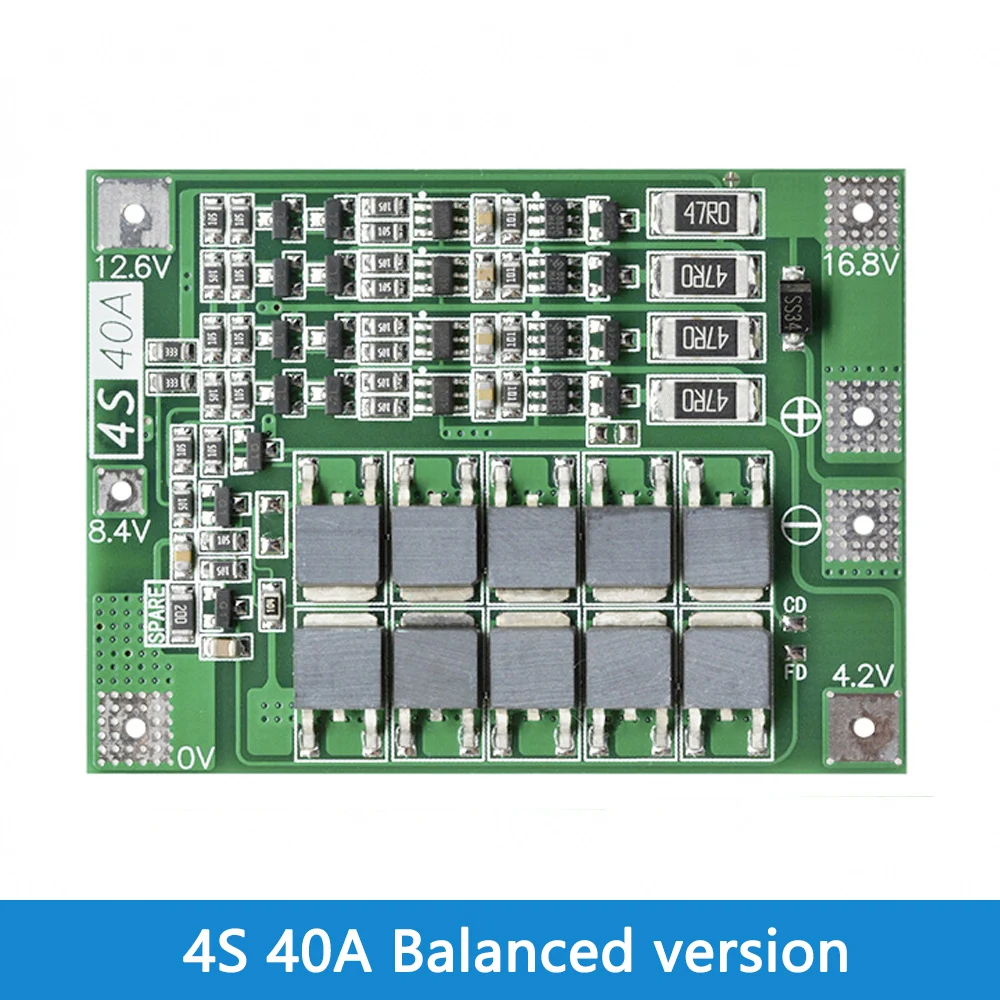
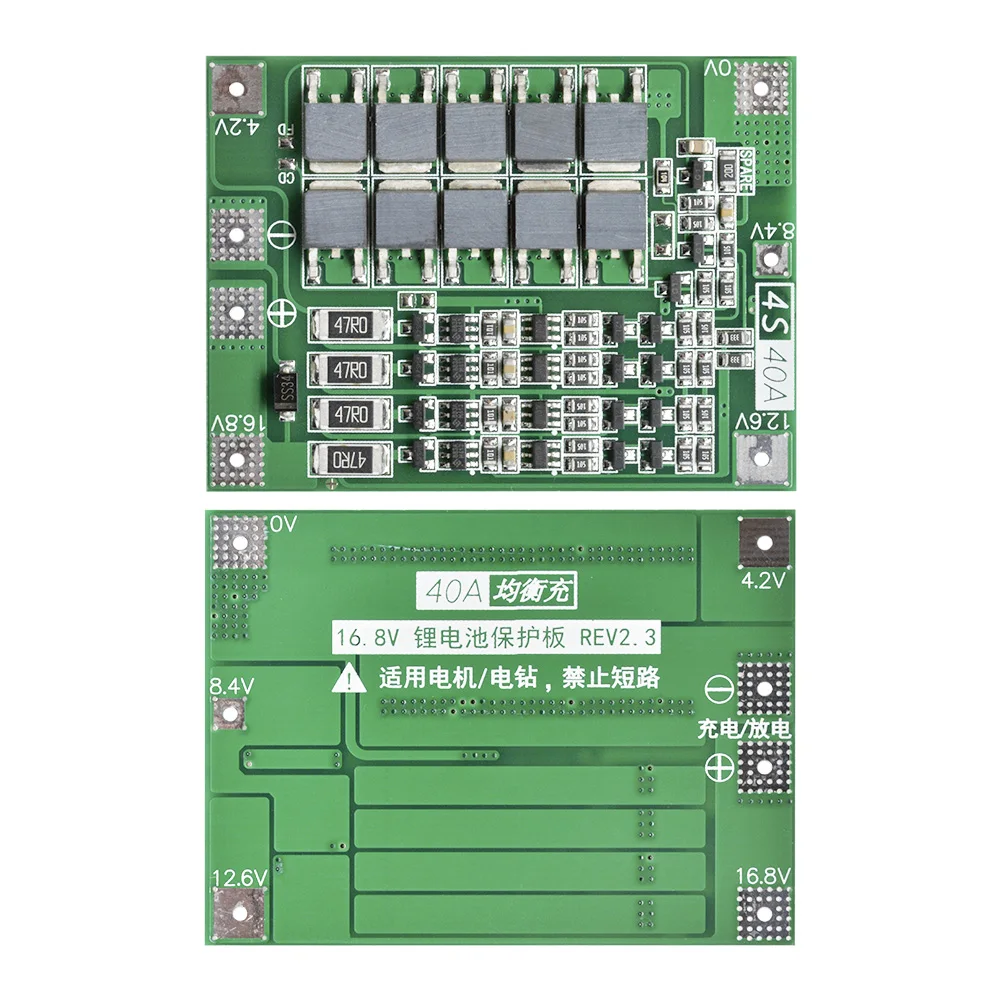
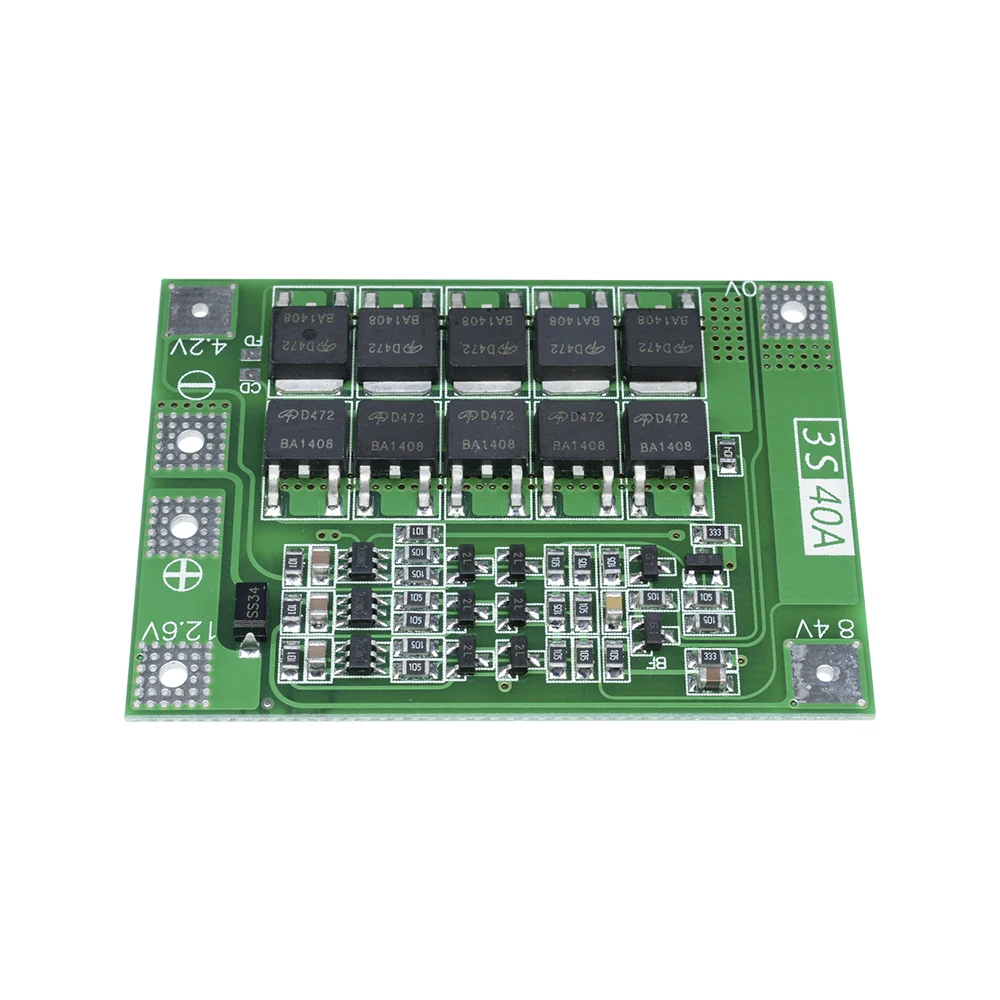
Product name: 4-series 16.8V 40A lithium battery protection board
Function: with balancing
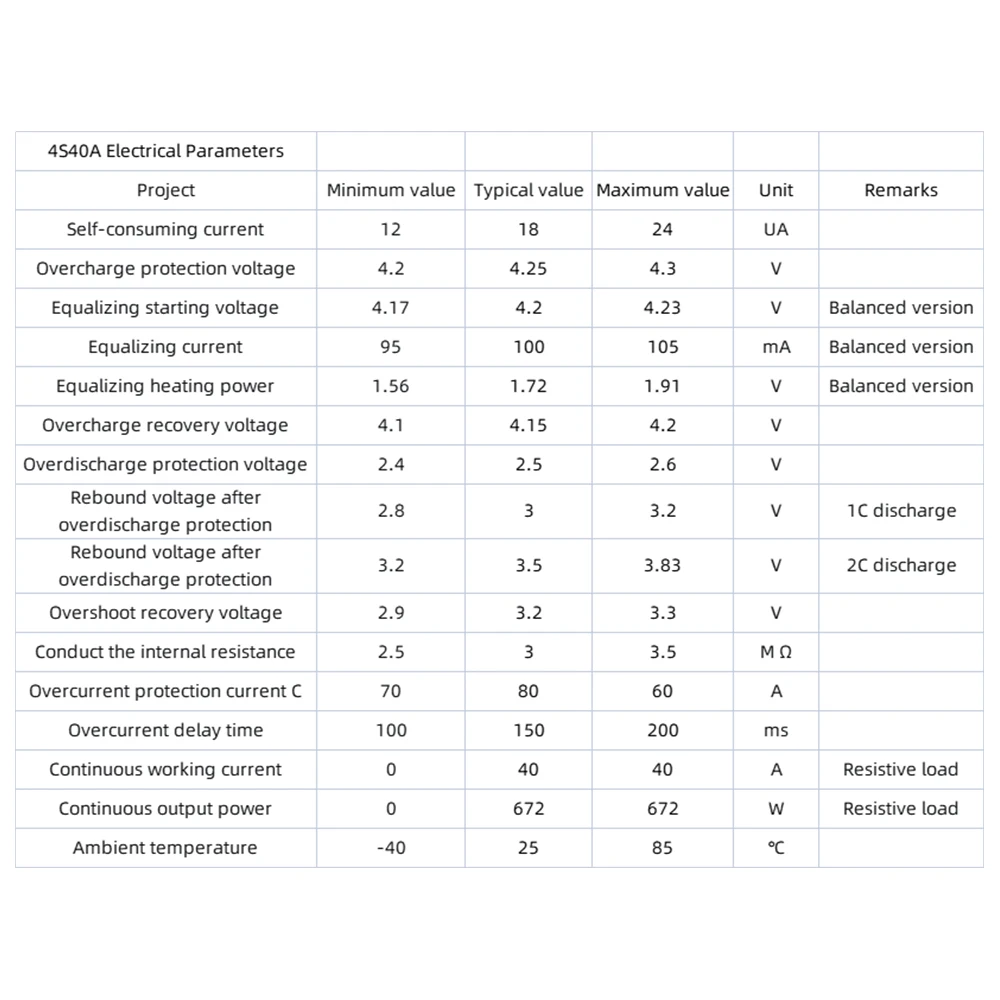
Charging voltage: DC 16.8-17.8V
Continuous discharge current: maximum 40A (if the heat dissipation environment is not good, please reduce the load current)
Continuous charging current: maximum 20A
Product size: 45*60*4mm
Applicable selection: suitable for lithium batteries with a nominal voltage of 3.7V and a full charge of 4.2v (including 18650, 26650, polymer lithium batteries), can be used with electric drills below 170w
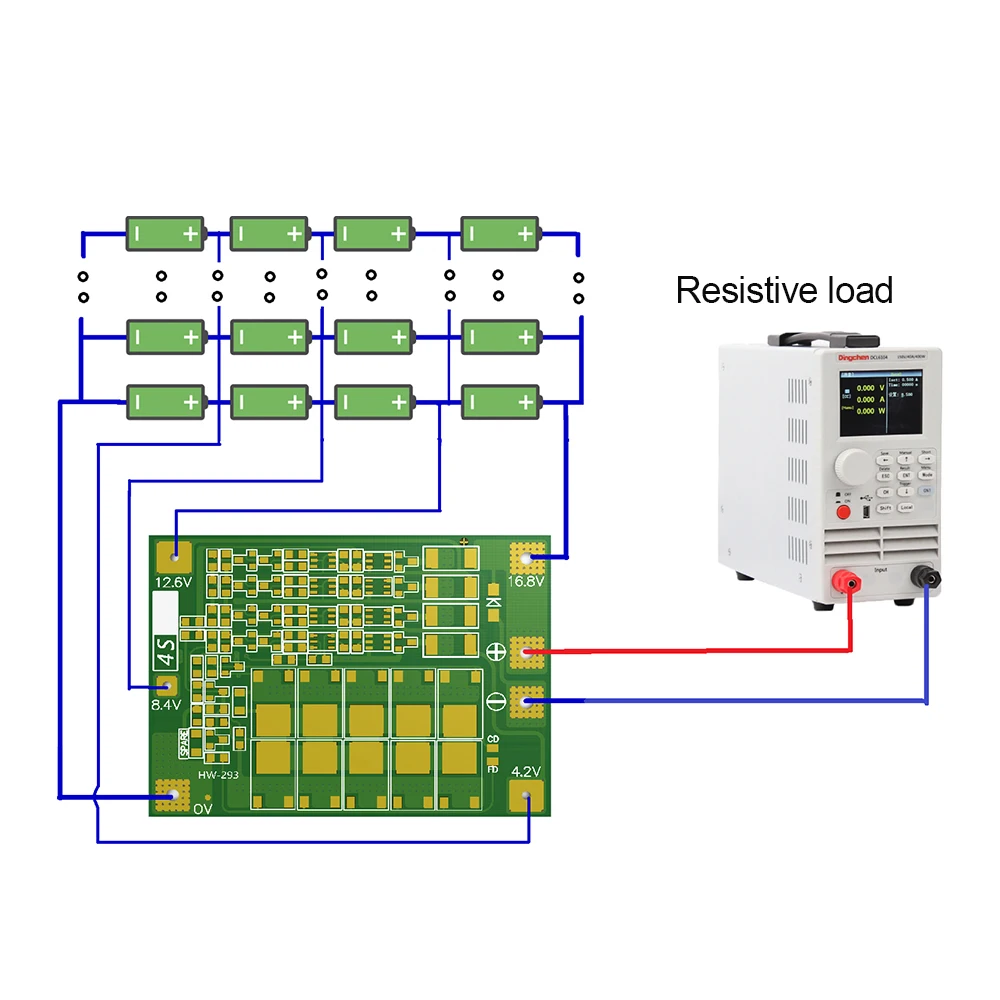
For example: the battery is 4-series, and the connected battery must meet the 40A discharge current, which can be achieved by connecting batteries in parallel or purchasing batteries with large discharge current. For example, if the battery is 2000mAH and the discharge multiple is 10C, then only 4 series and 2 parallels are needed, and the maximum current can reach the discharge current of 40A. Stable discharge requires 4 series and 4 parallels, and attention should be paid to heat dissipation. The discharge battery power will drop rapidly.
4 batteries in series, fully charged, voltage 16.8V, charging voltage DC17V~18V, charging current depends on the connected battery, maximum not exceeding 20A.
Notes
1: Successfully starting the electric drill requires 4 10C-20 power batteries, or 8 5C-10C power batteries (recommended power battery models: VTC4, VTC4A, VTCSA, VTC6), 0V and 12.6V connecting wires, use copper wires of more than 3 square millimeters (nickel sheets cannot be used).
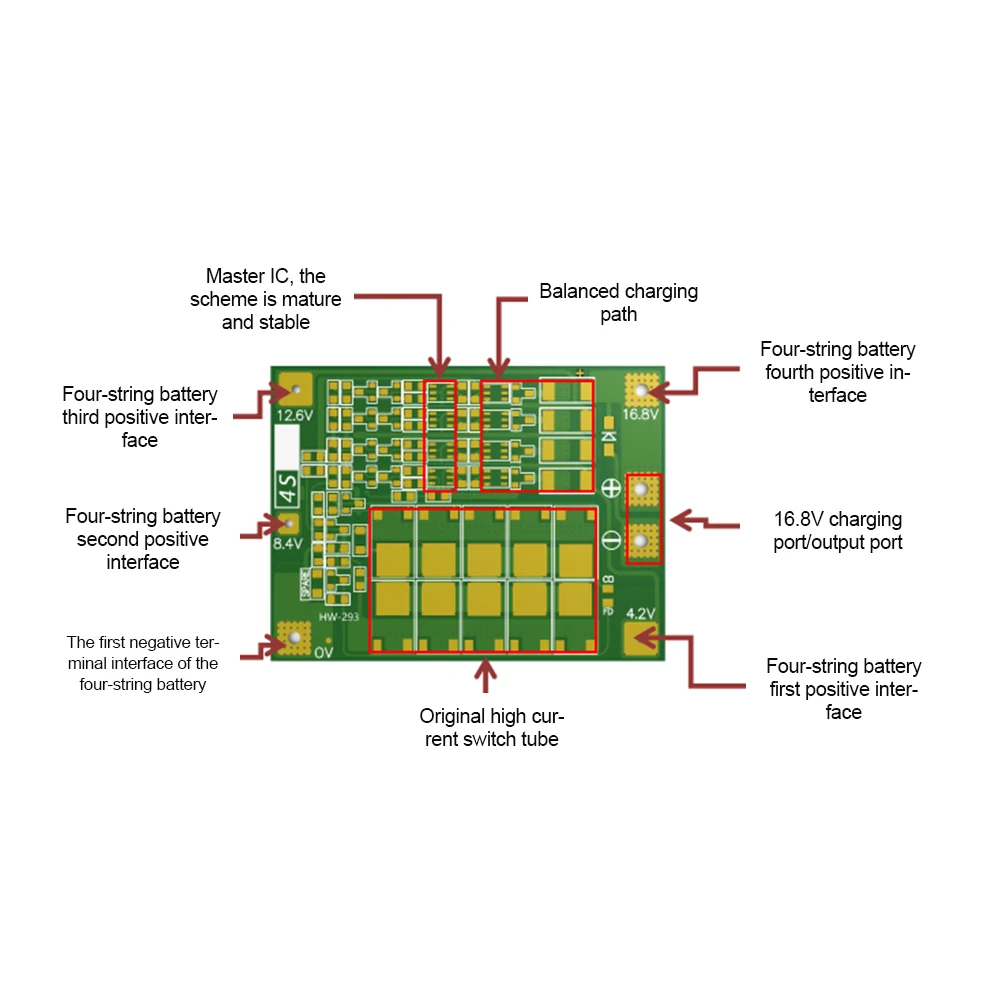
2: Strictly connect 0V, 4.2V, 8.4V, 12.6V, 16.8V according to the diagram. Do not touch any components on the board when welding wires, and do not deliberately short-circuit.
3: When welding batteries for the first time or charging, as long as a single battery exceeds 4.2V, the "430" resistor will heat up and discharge (discharge to about 4.19V to stop heating). If the "430" resistor is seriously heated (too hot to touch), please check whether the wires are connected incorrectly.

Product parameters:
Applicable scope: nominal voltage 3.6V, 3.7V lithium battery (including 18650, 26650, polymer lithium battery)
Charging voltage: 16.8V - 18.1V
Continuous discharge current (upper limit): 40A (if the heat dissipation environment is not good, please reduce the load current)
Continuous charging current (upper limit): 20A

Product parameters:
Upper limit working current: 20-25A
Working temperature: -40~+50°C
Upper limit instantaneous current: 35-40A
Storage conditions: -40~ +80℃
Quiescent current: <30uA
Internal resistance: <100mo
Balance current: 45mA
Charging voltage: 12.6V-13V
Over discharge voltage range: 2.3-3.0v+0.05v
Over charge voltage range: 4.25-4.35V±0.05v
Size: 56*45*4.0mm
Product parameters:
Applicable scope: nominal voltage 3.6V, 3.7V lithium battery
Product size: 42 * 55 * 3.4mm (enhanced version)
Product weight: 8.8g (balanced version)
Charging voltage: 12.6V - 13.6V
Continuous discharge current (upper limit): 40A (if the heat dissipation environment is not good, please reduce the load current)
Continuous charging current (upper limit): 20A
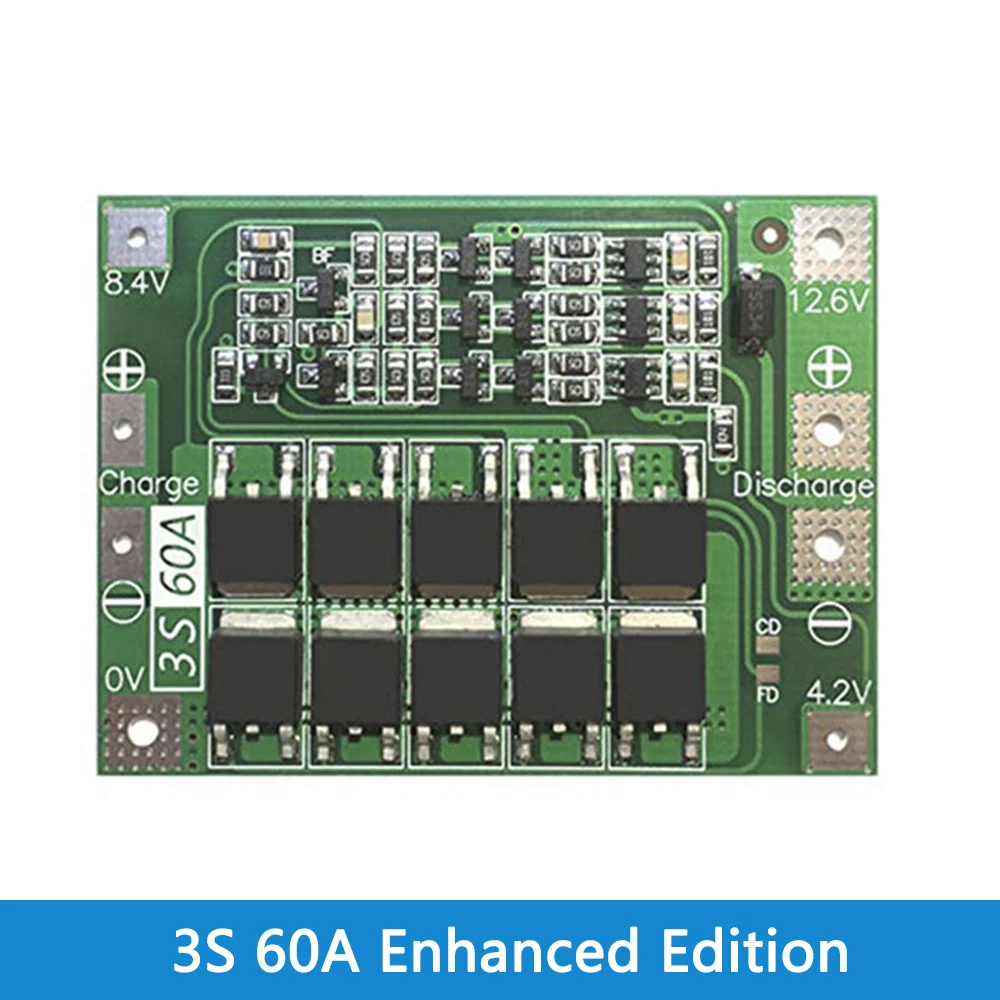
Product parameters:
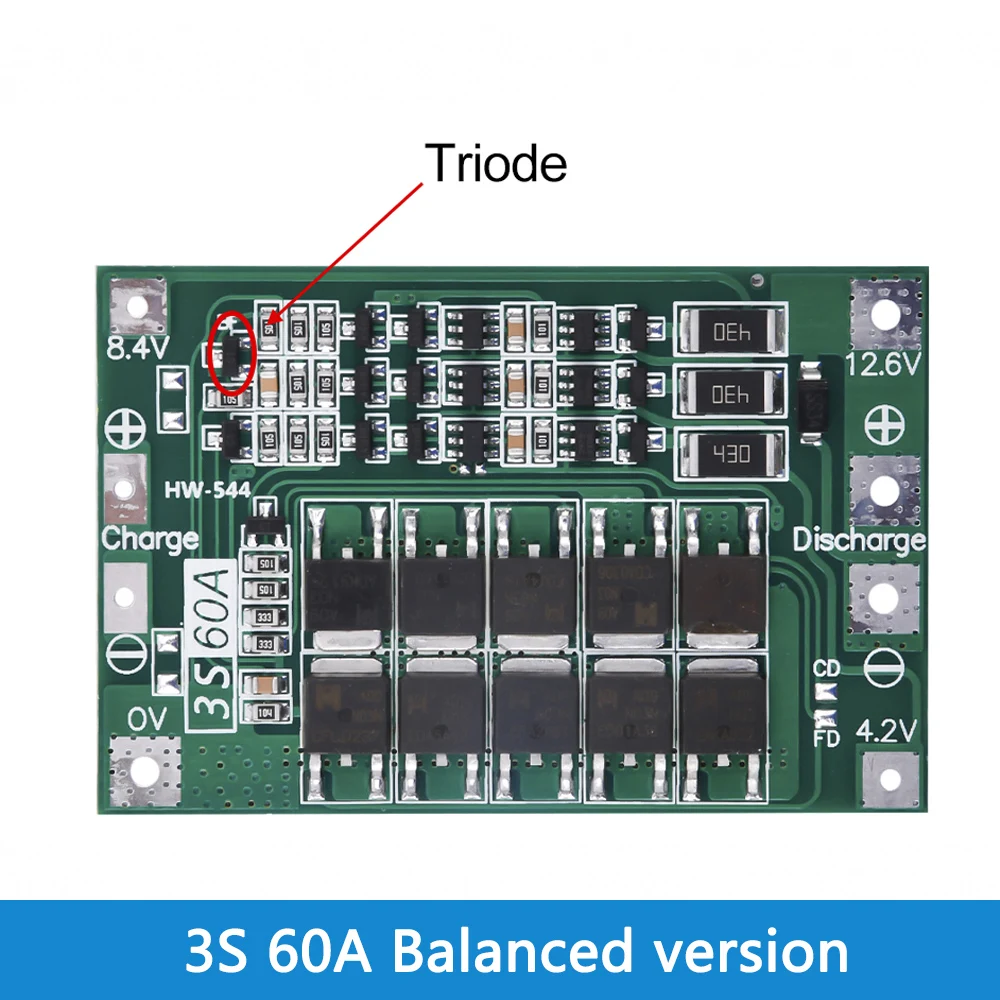
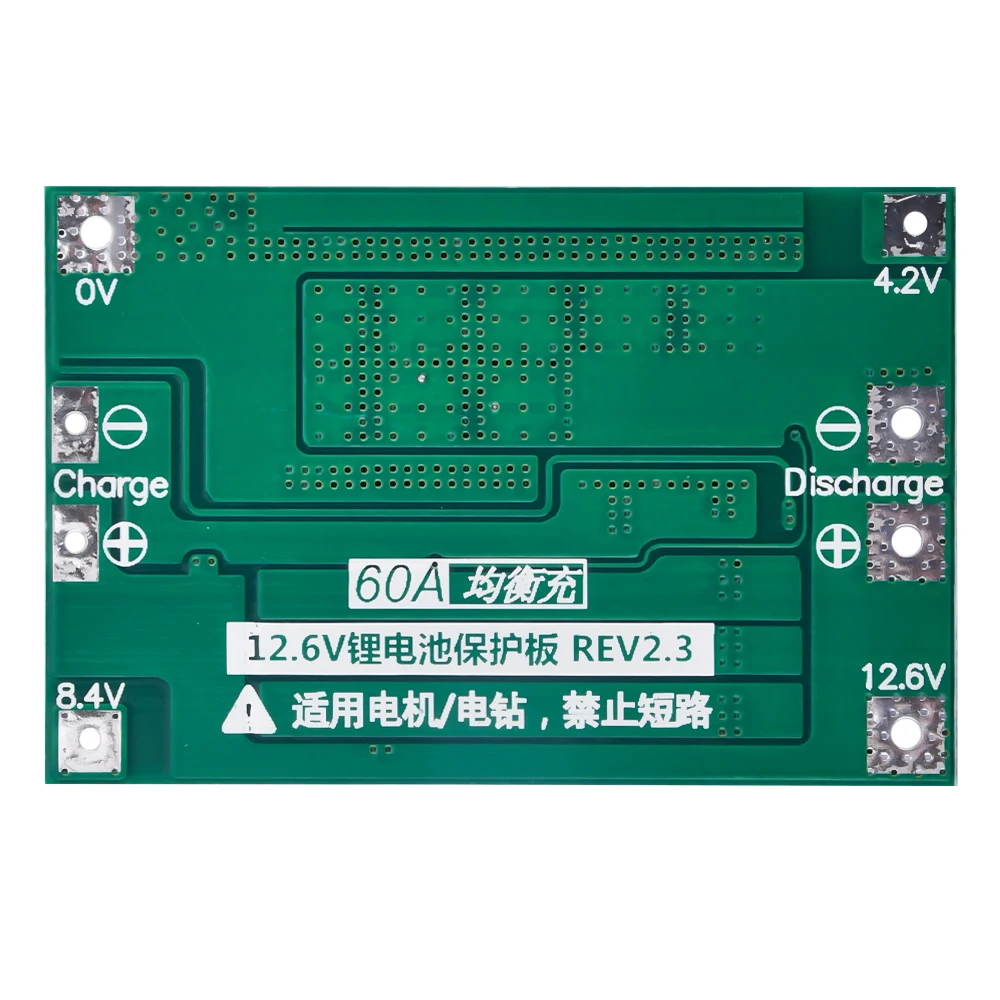
Product name: 3-series 12.6V 60A lithium battery protection board (balanced charging)
Product model: HW-544
Charging voltage: DC 12.6V~14V
Continuous discharge current: Maximum 60A (If the heat dissipation environment is not good, causing the module to overheat, please reduce the load current)
Continuous charging current: Maximum 10A
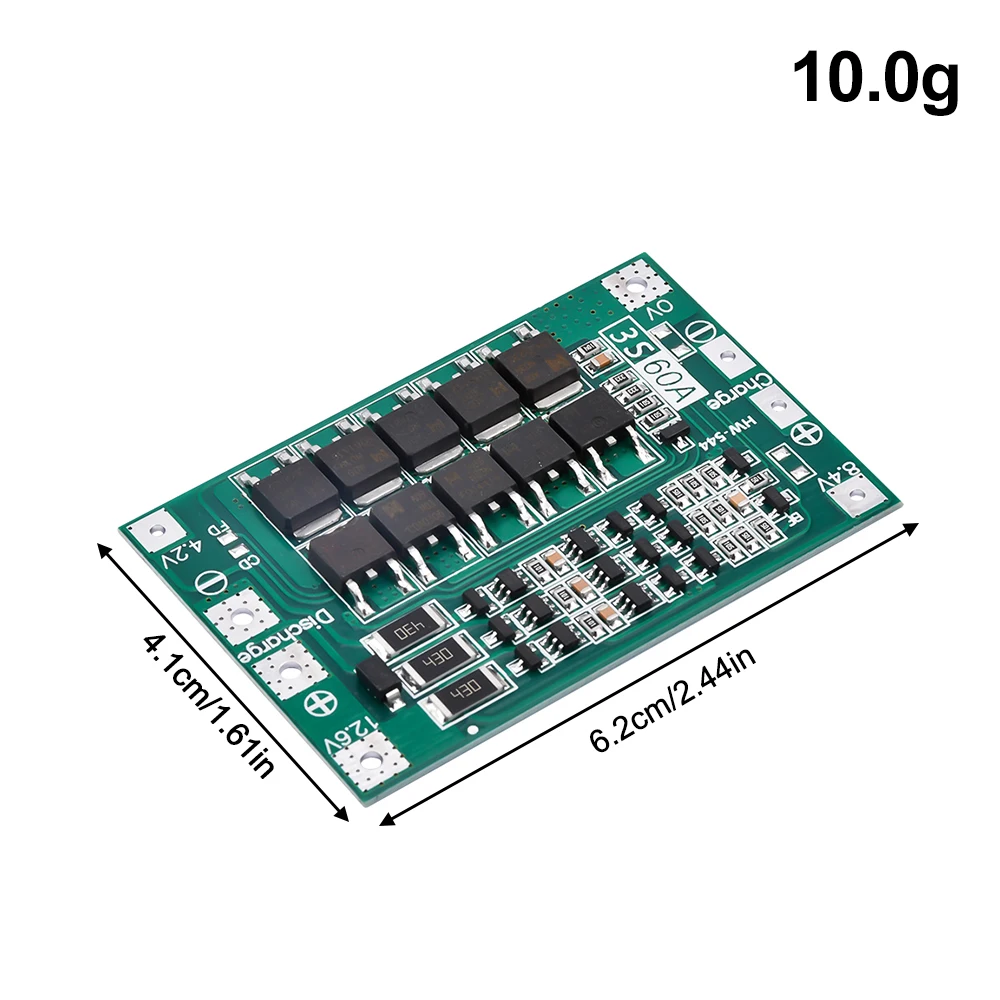
Product size: 41*62*3.4mm
Product weight: 9.8 grams
Note 1: Successfully starting the electric drill requires 3 10C-20C power batteries, or 6 5C-10C power batteries (recommended power battery models: (VTC4, VTC4A, VTCSA, VTC6), 0V and 12.6V connecting wires, use copper wires of more than 4 square millimeters (nickel sheets cannot be used!!!).
Note 2: Successfully starting a motorcycle requires higher battery requirements! 6 15C-2OC power batteries, or 12 10C-15C power batteries (recommended power battery model: SONY VTC4, VTC4A, VTC5A, VTC6), and the motorcycle needs a charging voltage regulator circuit.
Note 3: Strictly follow the diagram to wire OV, 4.2V, 8.4V, 12.6V. Do not touch any components on the board when welding the wires, and do not deliberately short-circuit.
For module discharge, the battery is 3 strings, and the connected battery must meet the 60A discharge current. This can be achieved by connecting batteries in parallel or purchasing batteries with large discharge current. For example, if the battery is 2000mAH and the discharge multiple is 10C, then only 3 sections are needed in series, and the maximum current can reach the discharge current of 60A. Stable discharge requires 3 series and 6 parallels, and attention should be paid to heat dissipation. The discharge battery power will drop rapidly.
Module battery charging, 3 strings of batteries, fully charged 12.6V. The charging power supply voltage is DC12.6~14V. The charging current depends on the current value set by the charging power supply and the battery power, and the maximum does not exceed 10A.
Product parameters:
Product model: HW-552;
Size: 41*60*1mm;
Charging voltage: 12.6V-13V;
Maximum operating current: 60A (excellent heat dissipation conditions);
Continuous charging current (upper limit): 20A;
Continuous discharge current (upper limit): 40A;
Overcurrent protection: 125A;
Overcharge detection: 12.8V (for 3 groups of batteries);
Overcharge release: 12.3V (for 3 groups of batteries);
Overdischarge detection: 2.4V (for 1 group of batteries);
Overdischarge release: 3.0V (for 1 group of batteries);
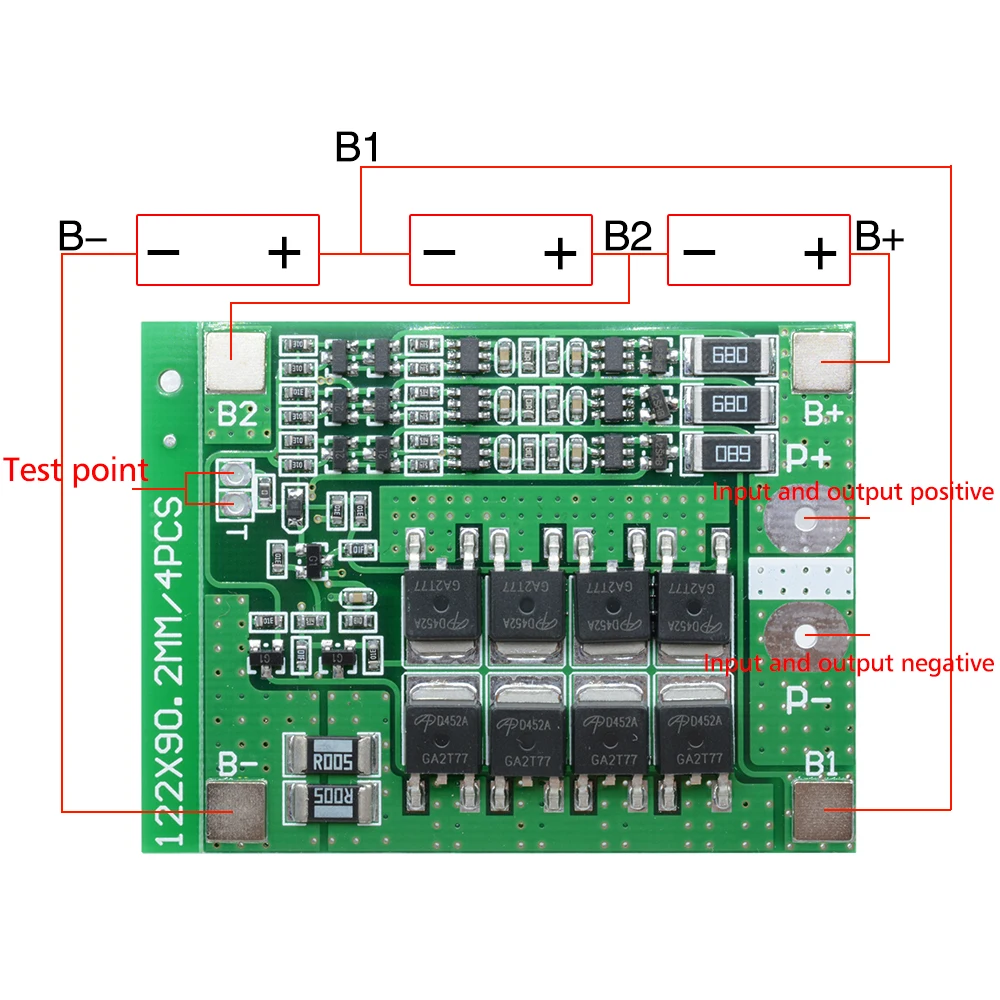
Operation instructions:
(1) First, connect the wires strictly according to the above diagram. The wires used should be good and the contact should be good, because even if the resistance is not too large, when a large current flows, it will cause a large voltage drop and generate a lot of heat, which will affect the performance of the board.
(2) Connect a 13V power supply to the charging end of the board and start charging.
(3) The board will detect the total voltage of the three battery groups in series. When the voltage reaches 12.8v, the board will turn off the battery charging circuit. This is overcharge protection.
(4) When the battery group voltage drops below 12.3v, the overcharge protection is triggered and the board will turn on the battery charging circuit again. This is overcharge relief.
(5) If the board turns on overcurrent/short circuit protection for some reason during charging, you need to remove the connection at the load end, then turn off the power and restart to cancel the overcurrent protection. You can also disconnect the load and wait for a few seconds, and the overcurrent protection will be automatically canceled.
B. Discharge (over-discharge protection) Conditions for successful start-up of the electric drill:
(1) The discharge current of the battery must be able to reach the minimum starting current of the electric drill;
(2) The connection between the battery group and the protection board should be as short as possible and the wire core should be as thick as possible; (3) If other conditions are found, please add them separately.
Note: (1) The wiring should be strictly in accordance with the above figure. The wires used should be good and the contact should be good, because even if the resistance is not too large, when a large current flows, it will cause a large voltage drop and generate a lot of heat, which will affect the performance of the board.
(2) Connect the load, and the lithium battery pack supplies power to the load through the board. Under good heat dissipation, the board can withstand a continuous current of 40A. If the heat dissipation is very good, it can even reach 6OA.
(3) During the discharge process, when it is detected that the voltage of a certain group of batteries drops to the over-discharge voltage limit, the board turns on the over-discharge protection and turns off the discharge. Note that the battery voltage detected during the discharge process of the board will be lower than the voltage value measured at both ends of the battery with a multimeter. This is caused by the wires and the inside of the battery. Therefore, after turning on the over-discharge protection, you use a voltmeter to measure the voltage at both ends of the battery, which is often higher than 2.4V. In addition, if the connection between the "ov" terminal on the board and the negative electrode of the battery is not good, it will also cause the over-discharge protection voltage to be higher than 2.4V.
(4) When the battery voltage rises to more than 3V, the over-discharge protection is released. If the over-discharge protection is not released, you can disconnect the load and the over-discharge protection will be released.
c. Over-current protection.
When the current is too large, the board turns on the over-current protection, the line connection is disconnected, and charging or discharging stops.