| ||||||||||||
Categories
   | Our Store DescriptionSoccer Ball Car Truck Window Decal Sticker Vinyl Sports Auto Decor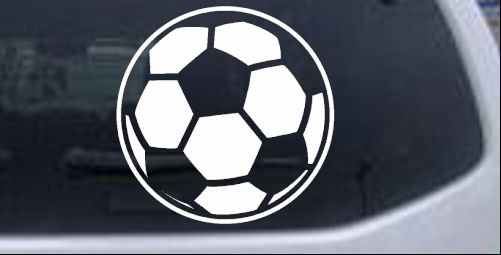 Image above is for reference only. Choose the size and color at the top of this listing Details Soccer Ball Car Truck Window Decal Sticker Vinyl Sports Auto Decor
These decals are built tough and designed to bond with any clean, smooth, flat surface. If it's smooth, clean, and needs attitude, they can stick to it! Super strong and permanent. Once they're placed, they're committed! (Choose your spot wisely!) Vehicle V.I.P.s: Slap them proudly on the outside of your car windows, bumpers, or side panels. They laugh in the face of rain, sun, and car washes, staying vibrant for years. (They are not the wimpy clings that hide on the inside!) Home Decor Heroes: Perfect for jazzing up mailboxes, trash cans (seriously!), storage containers, smooth doors, or even creating custom signs for your home or workshop. A Friendly Heads-Up! This stuff means business! Because of that permanent, stick-like-glue attitude, it's best buddies with glass, metal, and smooth plastic (think windows, mirrors, mugs and mailboxes). Avoid Painted Walls! This is an outdoor-grade vinyl. If you stick it on your interior drywall, it will probably take the paint with it when you try to remove it later. (Trust us, your landlord won't think that's fun.) Frequently Asked Questions
Rad Dezigns Decals Usage What can the Rad Dezigns Soccer Ball Car Truck Window Decal Sticker Vinyl Sports Auto Decor Decal Sticker be used for? While the Rad Dezigns Soccer Ball Car Truck Window Decal Sticker Vinyl Sports Auto Decor Decal Sticker can be applied to any smooth flat or semi-curved surface here are just a few examples of where you might use the Rad Dezigns Soccer Ball Car Truck Window Decal Sticker Vinyl Sports Auto Decor Decal Sticker.
Installation *** Your Decal Will Come With A Link To A Video Showing How To Install It *** Rad Dezigns decals are very easy to install. Decal Installation: The Fun & Easy Way You've got your awesome decal, now let's get it stuck where it belongs! Follow these simple steps for a flawless, bubble-free application. What You'll Need: Your Decal (The Star!) Rubbing Alcohol or window cleaner (Windex is fine for glass) A Credit Card or a plastic squeegee (Your new best friend) A Lint-Free Cloth or paper towel Masking Tape (Optional, but handy for large decals) Step 1: The Clean Freak Phase Your surface (window, laptop, tumbler, etc.) must be spotless. Mission: Clean the area with rubbing alcohol or window cleaner. Then, dry it completely with your lint-free cloth. NO DUST, NO DIRT, NO GREASE! Anything left behind will make your decal grumpy and ruin the stick. Step 2: The Pre-Game Prep (Taping) Lay your decal face-up on a flat surface and rub the transfer tape (the clear or opaque top layer) firmly with your credit card. This ensures the vinyl is attached to the tape before peeling. Optional for Big Decals (The Hinge Method): Place the decal where you want it. Use a piece of masking tape to create a "hinge" running down the center, holding the decal firmly in place on your surface. Step 3: The Grand Peel Carefully and slowly peel the white or blue backing paper away from the transfer tape. The Goal: The entire vinyl design should be stuck only to the clear/opaque transfer tape. Uh Oh, A Stick-Back! If any part of the vinyl tries to stick to the backing paper, stop, lay it back down, and press that spot firmly with your credit card before trying again. Step 4: The Application Drop Hold the transfer tape (with your sticky-side-out decal) taut and carefully position it over your clean surface. Tip: Start from one edge (or the center if using the hinge method) and slowly lower the decal onto the surface, avoiding bubbles. Step 5: The Squeegee Showdown! Starting from the center and moving outward, use your credit card or squeegee to firmly rub every single inch of the decal onto the surface. Rule of Thumb: Rub it until your arm gets tired! The more pressure you apply now, the better the vinyl will stick when you peel the tape off. Step 6: The Big Reveal (Slow Motion is Key) Wait 1–2 minutes, then slowly and carefully peel the transfer tape back on itself at a sharp, 180-degree angle. Keep an eye out! If any part of the decal lifts, stop, press the transfer tape back down in that area, re-squeegee it firmly, and try peeling again. Congratulations! You are now the proud owner of a perfectly applied, awesome vinyl decal! The Curing Caution: Avoid washing or scraping the area for the first 48 hours. This gives the adhesive time to "cure" and bond completely to your surface. Shipping We ship via USPS (Post Office) with tracking on all orders. Orders ship next business day after payment has cleared. Legal Rad Decals, Rad Dezigns and or any other company or individual associated with Rad Decals, or Rad Dezigns in any way are not responsible for any damage occurring from removing or installing any Rad Dezigns decals. This includes but is not limited to paint on walls or other painted surfaces peeling off while removing the decal. Rad Decals, Rad Dezigns or any other company or individuals associated with Rad Decals or Rad Dezigns in any way are not responsible for any damage to the decal or surface the decal is being applied on resulting from installation of the decal. Rad Decals, Rad Dezigns or any other company or individual associated with Rad Decals or Rad Dezigns in any way are only responsible for defects in the decal manufacturing process. Any and all other problems. damage to property or installation defects that may arise are the responsibility of the customer (end user). Logos and Images: The images shown on the left side of this listing are the sole property of their respective owners (ebay and paypal). The rating, status, and verification were all current as of this listing being published. ALL DESIGNS LISTED ARE PROTECTED UNDER A U.S. FEDERAL COPYRIGHT TO RAD DEZIGNS. ANY REPRODUCTION OF ANY RAD DEZIGNS DESIGN IS A VIOLATION OF FEDERAL COPYRIGHTS AND CAN RESULT IN HEFTY FINES AND EVEN JAIL TIME. | |||||||||||