Custom LED ELFR-1-QD LED Flasher Relay — Yamaha V Star & Stryker
Quick-Disconnect · MPN ELFR-1-QD
Overview
The Custom LED ELFR-1-QD is the same proven electronic LED flasher relay as our ELFR-1, fitted with male quick-disconnect terminals so it hard-wires neatly into Yamaha cruiser harnesses. It restores the normal DOT blink rate on the Yamaha V Star and Stryker with stock blinkers, LED blinkers, or any mix of the two.
Fast “hyper” flashing shows up when your turn-signal lamps draw less current than the bike's flasher expects — usually after switching to LEDs, but it can also appear on bikes that already had LED signals once you fit lower-draw aftermarket LEDs. The ELFR-1-QD holds the right blink rate either way: with stock bulbs, LED signals, aftermarket LEDs, or any combination.
Because the QD is wired by terminal rather than a keyed plug, take care to identify the switched-power and load wires before connecting — see the Installation section below. As long as your total signal load sits between 0.05A and 10A (about 0.6W to 120W), it holds the correct DOT blink rate.
Key Features
- Male quick-disconnect terminals — plug into compatible OEM connectors or hard-wire on custom/cruiser applications
- Same proven electronics as our ELFR-1, in a hard-wire-friendly form
- Holds the correct OEM blink rate with stock, LED, or aftermarket LED signals — in any combination
- Solid-state design with near-zero turn-on delay
- Ideal companion for Custom LED Integrated LED Tail Lights
- Manufacturer-direct purchase, backed by a 1-year warranty and satisfaction guarantee
Specifications
| Minimum Rated Current | 0.05 A |
|---|---|
| Maximum Rated Current | 10 A |
| Rated Voltage | 12 V DC |
| Flash Rate | Constant (OEM rate) |
| Terminals | Male quick-disconnect (Red = +12V, Black = load) |
| Dimensions | 1.2" × 1.77" × 0.74" |
Compatibility
ELFR-1-QD Yamaha V Star & Stryker (USA spec)
- Yamaha V Star 650 / 1100
- Yamaha Stryker
These are common applications. The ELFR-1-QD fits 200+ motorcycle models across many makes — use the Year / Make / Model finder at the top of this listing to confirm your exact bike and year, or compare your OEM flasher relay connector before ordering. USA-spec shown.
No problem — this relay fits 200+ motorcycles, so it may still be the right one for your bike. Check the Year / Make / Model compatibility list at the top of this listing to confirm fitment — or see our other LED flasher relays below.
See our other LED flasher relaysInstallation
The ELFR-1-QD installs one of two ways, depending on which flasher relay your motorcycle came with. Find the type that matches your bike below.
1 Plug-in OEM relay — 2 or 3 wires, ¼″ spade terminals
 🔍 click to enlarge
This covers most motorcycles. If your factory relay is a small box with flat ¼″ male spade terminals (usually 2 or 3), the ELFR-1-QD wires straight in.
- Locate and unplug the OEM flasher relay (check your owner’s or service manual if you’re unsure where it sits).
- Identify the two wires. One is switched +12V (live with the key on); the other is the blinker load (to the lamps). Use a test light or voltmeter — or read the relay’s markings: most are stamped B (battery / +12V) and L (load / lamp).
- Connect: ELFR-1-QD Red → +12V (B), Black → load (L). If the connector has a separate ground wire, leave it unconnected.
- Double-check, then test — your signals should blink at the normal DOT rate.
2 Self-canceling 5-pin relay (Denso)
 🔍 click to enlarge
Certain cruisers — many Yamaha Star models (Road Star, Roadliner, Stratoliner, Raider, V Star, Warrior) and some Kawasaki Vulcans — use a factory 5-pin self-canceling Denso relay. If your OEM relay matches the photo, follow this method and the diagram below.
Wire the QD into the OEM connector exactly as shown: Black → L (load), Red → B / +12V (switched power); leave the unused positions empty.
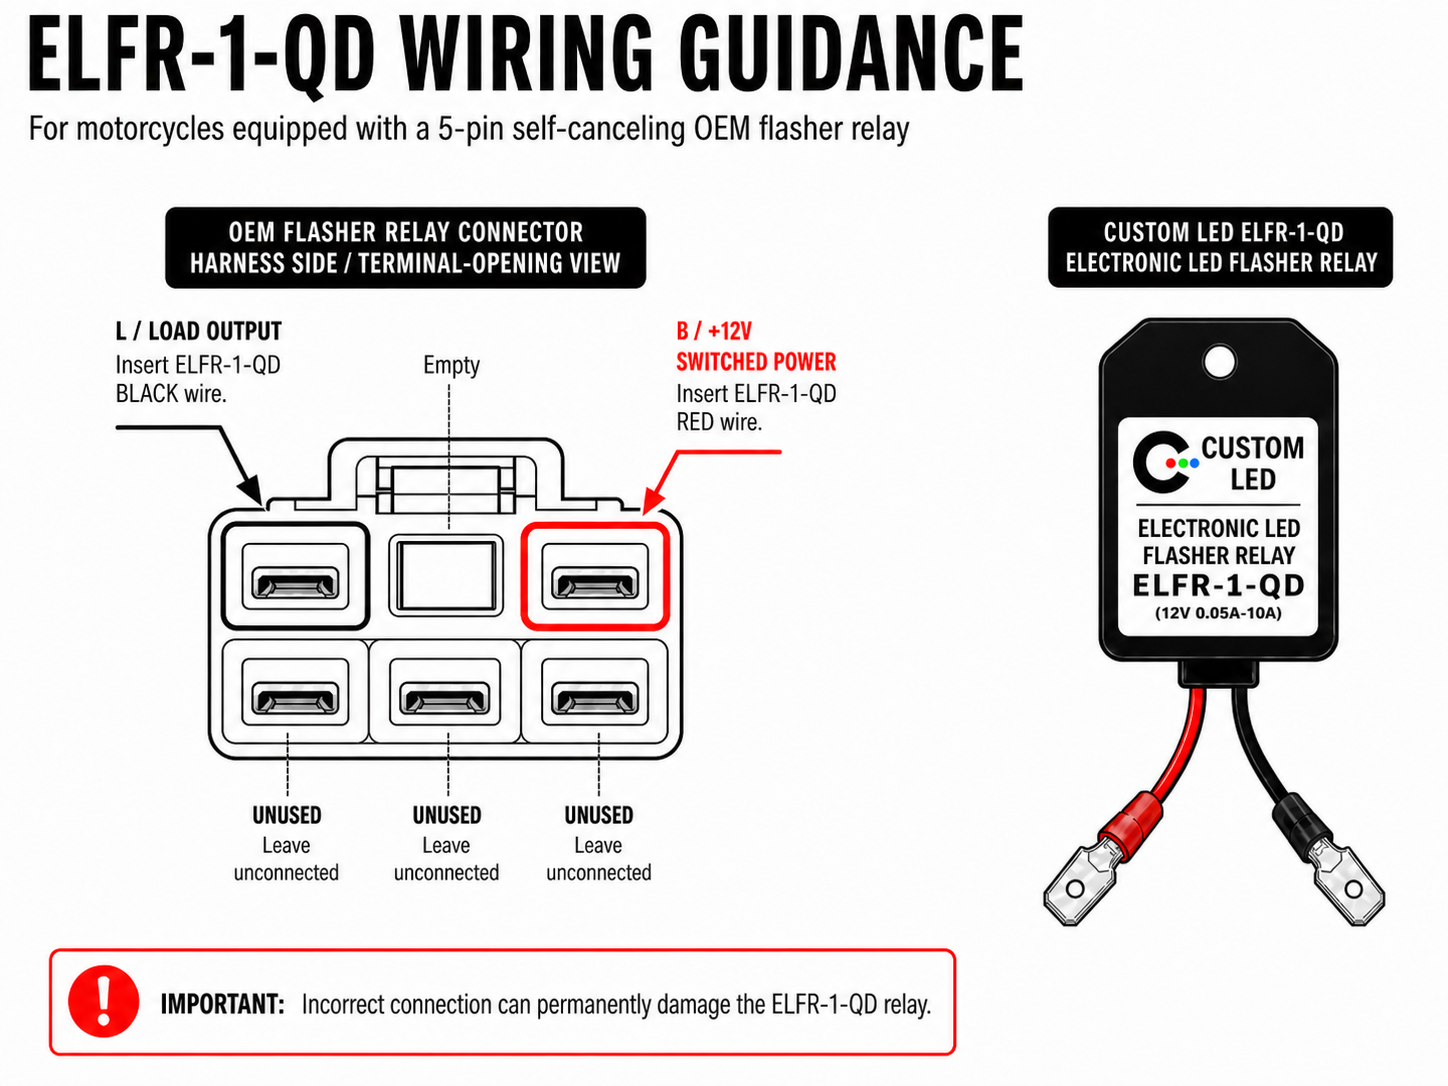 🔍 click to enlarge
Not comfortable working with motorcycle electrics? Have a qualified technician handle the install. Printed instructions are included with every order.
View the official Custom LED installation instructions (PDF)
If this document is blocked from opening here, you can also download it from the Custom LED website.
Troubleshooting
If your signals are not working correctly after install, check:
- Red is on switched +12V and Black is on the blinker load — not reversed
- The turn-signal fuse in your motorcycle's fuse box is good
- The quick-disconnect terminals are fully seated and secure
Still stuck? Message us — our US-based support team will help you sort it out.
Why Buy From Custom LED
This is a manufacturer-direct purchase straight from Custom LED, backed by our 1-year warranty and satisfaction guarantee. We ship every order on or before the handling time promised on this listing.
Custom LED • ELFR-1-QD • Manufacturer Direct