

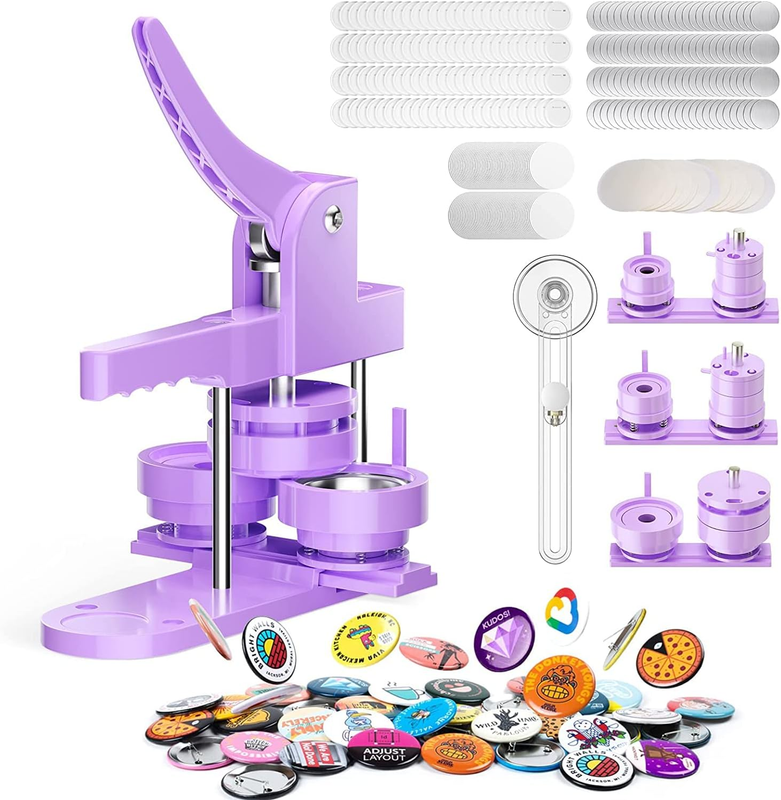
300Pcs Button Pin Maker Machine Multiple Sizes 1''+1.25''+2.25'' Badge Button Press Machine W/Metal Pinback Button Refills & 3 Button Making Dies & 3Pcs Circle Cutter - Pin Press Kit for DIY Button
Description
| Item model number | C108 |
| Number of Pieces | 300 |
| Color | Purple |
| Material | Metal,Plastic,Paper |
| Item Weight | 10.36 pounds |
| Shape | Round |
| Size | 25mm,32mm,58mm |
| Product Dimensions | 18.9 x 11.02 x 7.09 inches |
- Button Maker Multiple Sizes: 1 inch(25mm), 1.25 inch(32mm), 2.25 inch(58mm). Comes with complete crafting materials for 300 button badges. Pay Attention To distinguish the small and medium mould, do not install the wrong mould
- 300 Pin-back Button Badge Kits: You can make 300 button badges(100pcs for each size). The complete packaging kit makes a total of 300 pin buttons. The included circle cutters make it possible to make your own pieces of paper in the desired size
- Easy to Use: Makes a badge in less than 15 seconds after installation.Please watch the using video or manual in detail before use.Plastic pinback buttons do not put a plastic washer in making(only the 1.25" and 2.25" metal pin backs require a washer). We have included extra 1.25'' and 2.25'' washers for you to use when making metal badges
- Save Time and Energy: The badge button maker adopts the appearance of high-strength engineering plastic, the body and the mould are integrated, light weight and easy to operate. A top-rotating die not only improves efficiency and accuracy, but also facilitates better positioning. You will take less 15 seconds to make a badge when installed correctly
- Creative Gift: DIY Personalized Badge. Can be used for photo storage, ornament decoration, wedding name tags, classroom crafting, etc. We look forward to more creative design showcases from you!
Product description
1''+1.25''+2.25'' Button Maker Kit
METAL PIN-BACK BUTTON
- The entire button is made of 5 pieces (Clasp Pin, Metal Back, Metal Shell, Paper Graphic, Clear Plastic Cover).
- Our button dies are suitable for button parts marked 1", 1.25" and 2.25" on the market.
- 1 x Button Maker Machine
- 1+1.25+2.25 inch Button Making Dies
- 1''# 100 Sets Metal Button Making Supplies
- 1.25''# 100 Sets Metal Button Making Supplies
- 2.25''# 100 Sets Metal Button Making Supplies
- 3 pcs Circle Cutter
- 3 metal pins & 2pcs L wrench
- 1.25'' washer & 2.25'' washer
DIY Your Own Badges---300pcs
You can create your own design, assemble the badges, and then hand them out or sell them as needed.
How Do You Get a Good Design on Your Button?
With the right covers and backings, you should be able to use any round piece of paper and make a durable button. However, basic printer paper can lead to poor saturation and resolution images. Photo paper is better for more detailed images. Play around with ideas and make sure to cut your designs to the right diameter for the button machine.
- Button Badge Size: 1'', 1.25'', 2.25''
- Have an ergonomic handle with enough pressure.In the second press, apply enough force to bring all the elements together.
- There is a slide system for automatic positioning after properly installed. Have two compartments for setting up and pressing buttons for a smoother process.
- After you are proficient, you can make a badge in about 10 seconds
- You can make a total of 300 badges. 1''# 100pcs, 1.25''# 100pcs, 2.25''#100pcs
- For any size plastic pinbacks, do not put a washer under it. But for 1.25'' and 2.25'' metal pinbacks, DO NEED PUT A WASHER UNDER IT FIRST.
Attention: Installing the molds are important steps. Please do not install the mold in the wrong orientation. In most cases, subsequent making failures are caused by mold installation errors, so please follow the instructions and videos to install
Tips For You!
- When crimping the metal cover, paper and plastic clear cover, the pegs on the top mold do not go into the holes (as shown in step 4).
- When crimping the pinback button with top pieces, the pegs need go into the holes((as shown in step 7). Also, In this step, you need to use a little force to pull the handle to the end (Some reviews said "It won't crimp the paper and plastic clear cover around the metal backing". The failure was due to a lack of force during the second crimp).
- For medium(1.25 inch) and large(2.25 inch) metal buttons, please put a plastic washer under the pinback first. But for any plastic buttons, do not put a washer under it (as shown in step 5).
- How to solve the problem of badge crimping failure: When crimping the back material for the second time, hold the upper and lower handles to make the crimping tighter.
300 Sets Button Making Supplies---You can DIY 300pcs Badges
Button Making Problems - Solved Common Crimping Problems
Your first thought is usually that the machine is broken or the parts are defective but it is extremely rare that either of these is the case.
Question 1:"Why are my buttons coming apart" or "Why is there plastic clear cover not tucked in on the side of my button?"
Answer:
- Make sure there are no problems with the installation. If something goes wrong with the installation, all subsequent steps will fail.
- One of the most common causes is that your paper is too thick or too thin. We recommend using 24-28 pound copier paper.
- wrong circle graphics. Your graphic has to be cut exactly and even. It should not be bigger than the plastic clear cover and the edges need to be nice and even.
- You need to push the handle down with a bit of force in the last press. It is best to hold the handle tightly with your hands when pressing for the last time so that the upper and lower molds can be tightly combined with each other.
- The top die may become loose after a long time of use. If the mold is loose, that's maybe the cause you failed pressing. Because the vertical force between the upper and lower molds cannot be applied when pressing. Tighten with an L wrench before installing the upper mold if it needs(Do not over-tighten, make sure the upper die can rotate properly)
- Don't forget to put the metal pin that holds the sliding mold fixing. If there is no metal pin, the force of the upper and lower molds will not be uniform, which will cause the button to unsealed. Metal pin is easy to lose, so we've included a few extras for emergencies
- Only put one piece of paper and plastic clear cover at a time, too thick material can cause jamming and seal failure. Since papers or plastic clear cover are easy to stick together, you may not notice how many layers are there when putting
- Only for the 1.25'' and 2.25'' metal-back buttons do need put a plastic washer under it, 1'' button does not need washer.
ABOUT US
We’re dedicated to bringing you great deals on quality products. From home décor and garden essentials to tools, hardware, and pet accessories, our store has something for everyone — all at prices you’ll love.
SHIPPING
We ship all orders directly from the USA for fast, reliable delivery. Most items ship within 1 business day and include free shipping to the lower 48 states.
For international orders, we use eBay’s Global Shipping Program — simply continue checkout to see costs, duties, and taxes for your country.
FREE RETURNS
We offer a 30-Day Return Policy on items which you are not completely satisfied with. You have the option for a full-refund or an exchange of the item.
CUSTOMER SATISFACTION
We do everything we can to ensure every customer is 100% satisfied. If something isn’t right, just send us a message — we’ll make it right quickly!