Four-in-one multi-protocol tuner STM32 upgraded version

This four in one high-frequency head module integrates CC2500, NRF24L01, A7105, and CYRF6936 RF chips into one circuit board. It can recognize the PPM signal output by the remote control and convert it into the corresponding remote control protocol to control the receiver or aircraft. The currently supported protocols include: Huakele DEVO, Horizon DSM2, Fusi, Yisikai, Ruisikai, Weili, Habosen, Chiyuan, Futaba SFHSS Assan and other protocols.
This high-frequency head can control multiple different brands of quadcopters, helicopters, and fixed wings more flexibly and conveniently. Due to the continued use of your familiar remote control, the operation feel and flight experience are also better
Working parameters:
Working voltage: 5-14 volts Working current:<=100mA
Working frequency: 2.4G ISM band RF power:+22dBm
Main control chip: ARM Cortex-M3 (128K ROM, 20K RAM) Net weight: 45g, with antenna
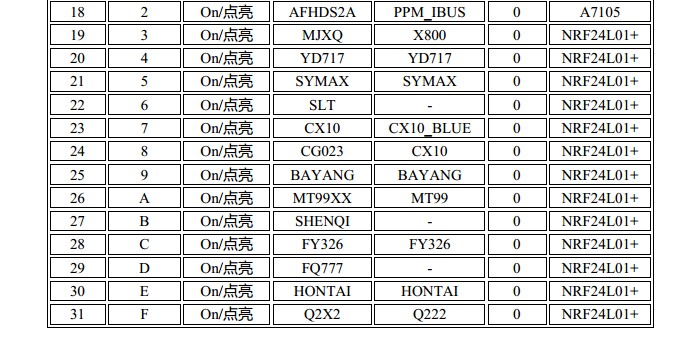
- When in PPM mode, there are 31 different protocols (protocol NO.0 is reserved for serial mode) mapping to the 16-position protocol selection switch on the module. They are listed in the default protocols table below, when the green light is off, you can use the switch to choose protocol NO. 1 to NO.15, when the green light is on, you can choose protocol NO.16 to NO.31.
- To turn on/off the green light, Please follow these steps:
Turn off you transmitter, point the protocol switch to ‘0’, hold and press the bind button of RF module, then turn on your transmitter, after 3 seconds, release the button.
Normal Use Operation in PPM Mode:
1. Install RF Module in position, Set PPM signal output on you transmitter.
2. According to the default protocols table, turn the arrow sign (the side with a vertical slot) of protocol switch to the proper number to choose protocol.
3. After finish binding operation, Power on your transmitter, the red light of RF module will be on, then RF module is ready to work , after that power on your receiver (or craft).
4. Protocol selection is done at the beginning of power up, so if you want to change protocol during operation, you should recycle the power.
5. The red light will blink slowly if there is no valid PPM signal.
Binding Operation in PPM Mode:
1. Power on your receiver, and set it to binding mode.
2. Hold and press the bind button of RF module, and then turn on your transmitter, after 3 seconds, release the button, you will see the red light flashing rapidly, then RF module is in binding mode, and the red light will go solid after binding.
3. Some protocols (eg: S-FHSS) don’t have binding procedure on RF module, and some protocols (eg: hubsan, e010)will auto bind when power up.
Operation in Serial Mode:
When the green light is off, and the protocol switch is point to ‘0’, you can access serial mode. Transmitter that supports the er9X/erSky9X or Open TX firmware can work in this mode, The model protocol selection and binding is done from the Model Settings menu on the transmitter, For telemetry capable transmitters, the telemetry integration is done seamlessly with the transmitter firmware.
For more information, please refer to the link below:Please contact us for it,thanks
About the Firmware Upgraded:
Two jumper caps are included. Do not short-circuit during normal use. When upgrading the firmware, you need to short-circuit according to the situation.
The tuner can be upgraded in two ways: USB serial cable or Micro USB cable (also known as the Android phone data cable). The USB serial port mode is relatively simple, so some users generally need a USB serial cable to upgrade.
For more information, please refer to the link below:Please contact us for it,thanks
Default Protocols in PPM Mode:

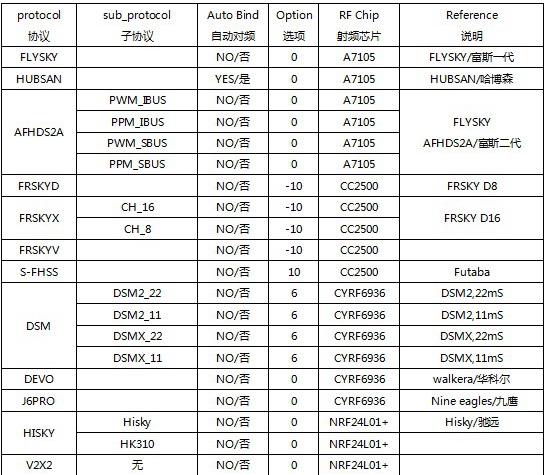
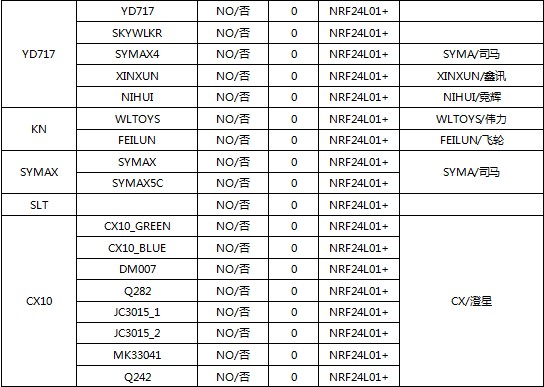
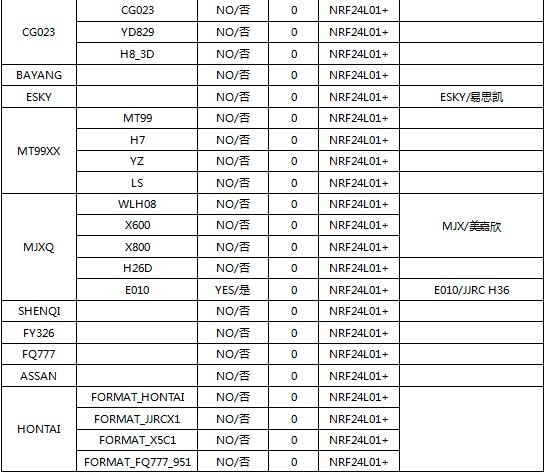
All Available Protocols for Serial Mode:

Powered by SoldEazy