
Stockist of Electronics, PCB equipment, Model Railway and Dolls house Electronics
Visit Our Shop | PCB Equipment | Dolls House | Hobby CircuitsModel railway 2 or 3 Position 2 Server Controller Module
Servo Controller – Instructions
The Servo Controller is designed to control the position and speed of two low power 5V analogue servomotors. Although there are connections for two servomotors, both servomotors are linked and will receive the same positioning signal from the controller. A typical reason for wanting to control two linked servos like this might be to control a pair of level-crossing barrier.
Please not that the servos are not included and these are sold separately.
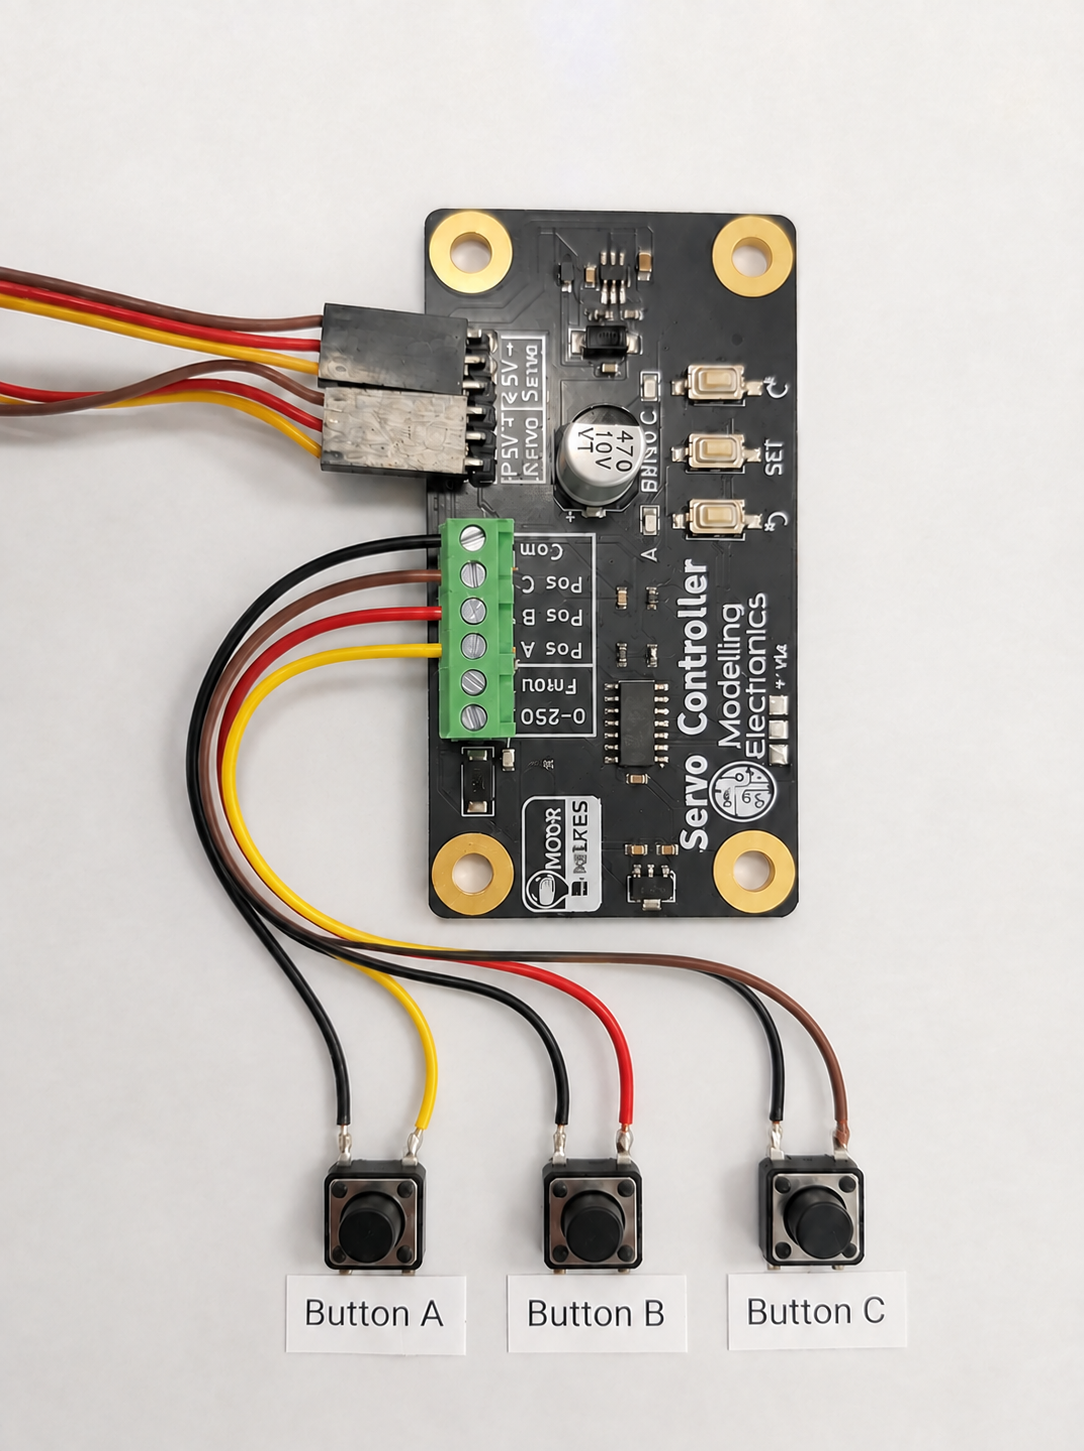
Wiring
The board will accept power between 9V and 20V DC only.
General Use
Once wired up, the orange power LED should light up, and the green LED labelled A should also be lit, indicating that the servomotors are in position A (by default 0 degrees).
To move the servo to position B (90 degrees by default) press the external button B.
To move to position C (180 degrees by default) press the external button C.
Setup
By default, the servos will move to positions of 0, 90 and 180 degrees when buttons A, B or C are pressed. They will also move at maximum speed.
You can change the three position angles, as well as being able to choose from one of four preset speeds of movement by putting the Servo Controller into Setup mode. To do this. Press and hold the SET button for at least 5 seconds until the orange LED goes out.
Once in Setup mode, the green LEDs still indicates which servo position is selected.
Pressing the left-most push switch will start the servo arm moving in one direction, the right button in another direction. Use this to adjust position A to the angle you want.
When you are happy with the position, press SET and the green LED for position B will light and the servo arm move to the current set position B. Adjust this if needed with the left and right buttons, as you did for position A.
Press SET again to repeat this for position C.
Pressing SET after position C will turn all three green LEDs on, indicating that you can now change the servomotor speed. Now, the left and right buttons will allow you to choose from four speed settings, that the servomotor will illustrate by moving back and forth at the speed chosen.
When you are ready to save the position and speed changes that you have made, press and hold the SET button until the orange LED lights up again (at least five seconds). The new settings will now be remembered, even if the Servo Controller is turned off and on.
Note that without this long press of the SET button, the changes will not be saved. So, if you want to discard the changes you have made, disconnect the power to the Servo Controller momentarily.
Factory Reset
If you find that the servo positions are all messed up and you want to start again, you can reset the Servo Controller to its default settings using the following procedure.
- Put the Servo Controller into Setup mode, by holding the SET button down until the orange LED goes out (at least 5 seconds).
- Press both the left and right buttons at the same time. The orange LED will blink 5 times while the Servo Controller's factory settings are restored.
Support
We understand that everyone has a different level of ability so we have a dedicated team to support our customers with pre and after sales.
If you require any support at all you can contact our dedicated support team via our FREE phone during office hours and till 8pm 7 days a week via email.
About Us
With over 25 years of experience in the electronics industry Modelling Electronics are a professional, family run business for the manufacture and supply of a range of electronic components, switches and electronic circuits dedicated to the hobbyist. Our electronic components and switches are aimed at hobbyists such as, model rail / model railroad, dolls houses and electronic enthusiasts.
All our circuits are made by in house staff rather than assembly lines so that we can help growth by employing staff within the UK. By buying from us you are helping employment levels within the UK. We are proud supporters of Talking 2 Minds charity (A charity aimed at helping Soldiers) and donate to them on a regular basis.
Although ebay says we are a VAT registered seller we are not VAT registered and cannot give a VAT invoice and do not charge VAT.
FAQ's, Tutorials & Projects
If you are interested in electronics or developing your own printed circuit boards we offer a number of FREE tutorials and projects which you can read on our website or our YouTube Chanel. We also have created a common frequently asked questions section to help users. This covers things like an LED resistor calculator, all about diodes and capacitors, how to develop a printed circuit board plus much more.
If you require access to these FREE tutorials please feel free to contact us or visit our website.